

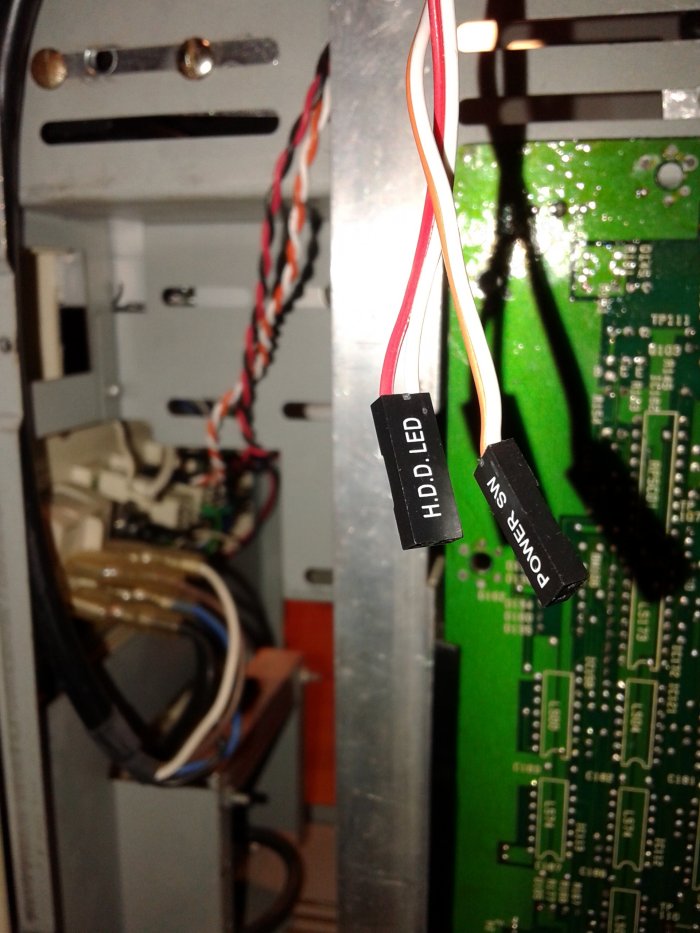
Below is February 2022
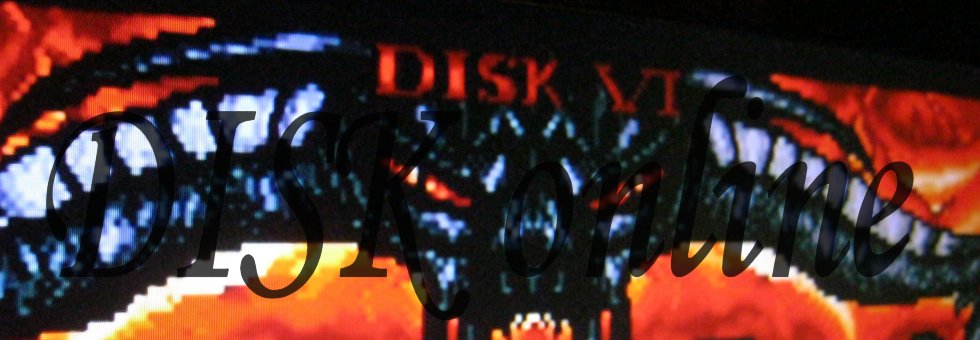
Supersoniqs

I've always been an enthousiast of electronics, but I never got deep into it. It touched the surface and went a bit below. Enough to have gathered some equipment to be able to do some basic soldering. Today a professional microsolderer would not have anything to complain in my soldering corner.
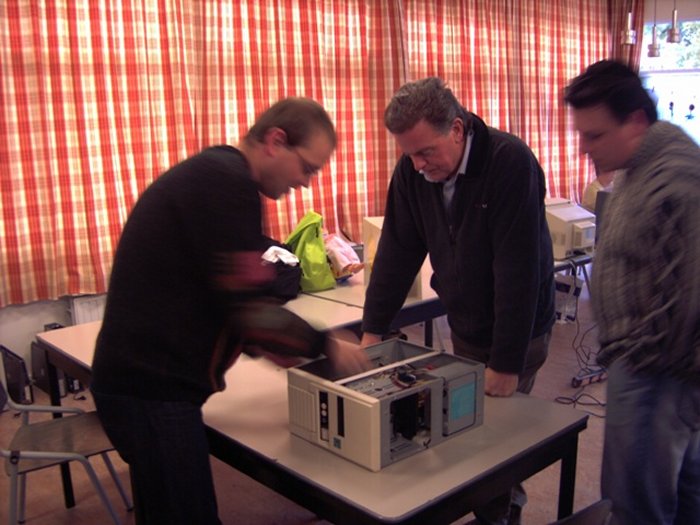
Though, the orders for soldering were practically non-existent and I didn't have a lot to fix myself, so I decided to contact Supersoniqs in December 2021. They were happy enough with my offer. Not soon after the whole warehouse was transported to me. That was quite overwhelming. I was used to have a couple of ICs, some capacitors and resistors. Now I had to watch out where I put my feet.
Soon I got used to parts and found my own procedures of storage and set off building several Neotron cartridges. The big challenge of that was the Altera Max chip which is a 144 pin quad flatpack. Though practice made perfect. After some thirty units i was asked to build some Modulon slot expanders. Modulon is all old fashioned through hole which was fun to do, but I found my bigger friend in surface mount components. More challenge and easier to replace broken parts during testing. After some twenty Modulons I was asked to build some Playsoniqs. That was a nice challenge. After building some fifteen units I ran out of SID and VDP chips.
It's just some seven weeks after I started my soldering job and I've built big quantities of MSX gear that actually works. I'm totally happy with my decision to join Supersoniqs.
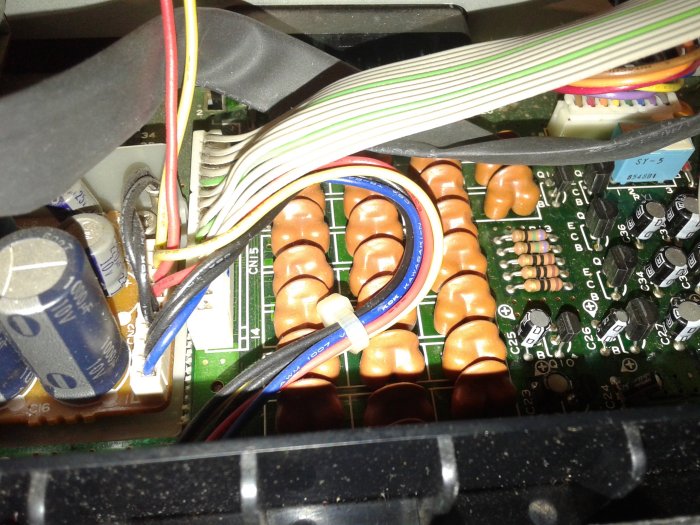
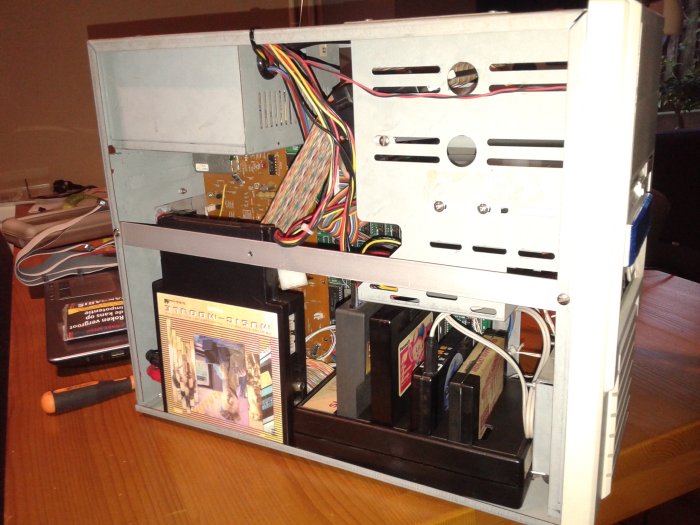
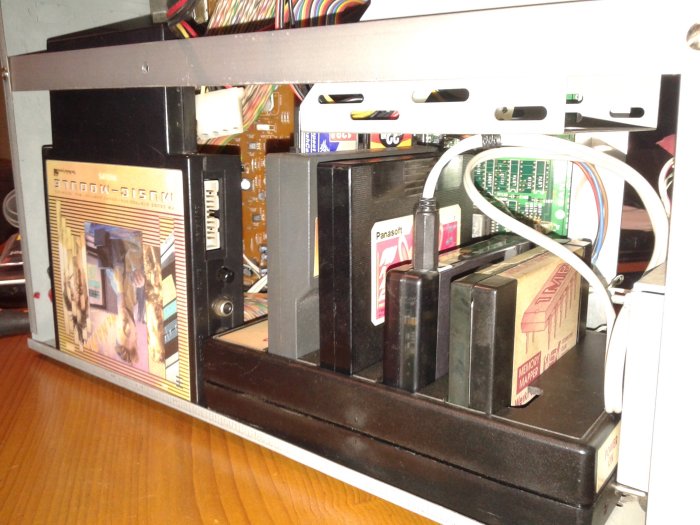
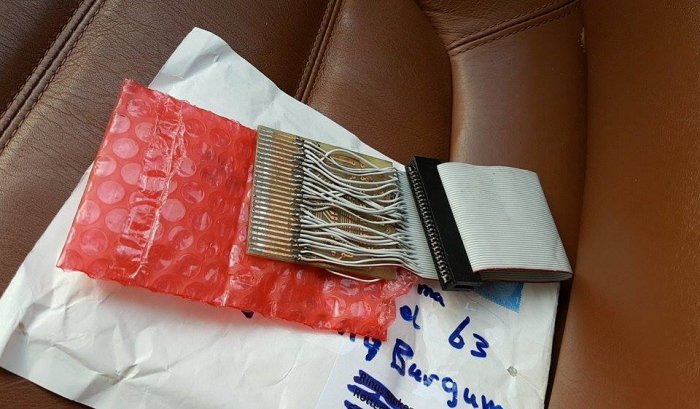
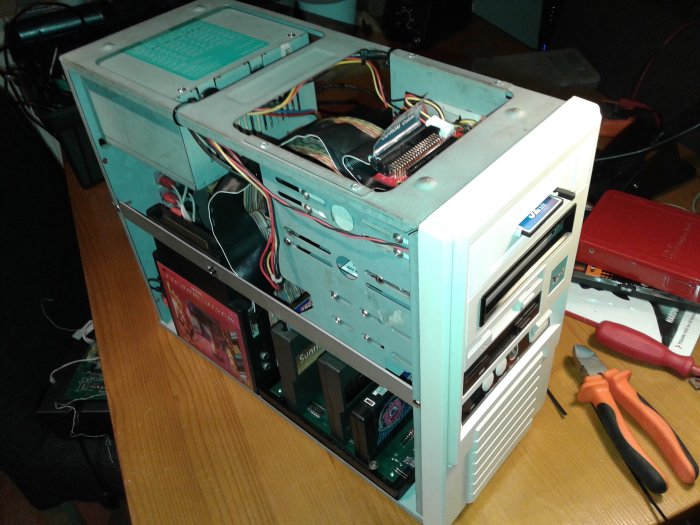
Here's a Playsoniq cartridge:

Detail of the Quad Flatpack on it.:

![]()
Below is September 2020
About 7MHz
In the nineties in Holland it was very popular to have your MSX2 upgraded to run at 7MHz. One big turn down was in the music. When the MSX was switched to 7MHz the pitch of the music went up. To make matters worse pure 7MHz is only achieved when letting only the z80 do its work. As soon as the VDP is set to work, the 7MHz backs off and returns when the VDP is done. This results in a very irregular pitch shift which is very hard on the ears.
Back then there were solutions to fix this problem by putting an oscillator in the music cartridge. This would fix the issue of pitch. Today those oscillators are not common anymore so an other solution had to be found.
I started thinking out loud at omegaMSX about this "issue" and suggested it would be nice to feed the cartridge slots with a constant 3.5MHz frequency. But where to find it? The answer was the VDP.
I did some research and found out cartridge slot pin 42 feeds the cartridge with the current frequency and pin 8 of the VDP sends its 3.5MHz frequency. The VDP's frequency got cut off when modding the computer to 7MHz. So there just had to be a connection between the both. I consulted omegaMSX about this theory and he said it would probably be the solution so I set off and performed the fix.
Make a cut on the mainboard to isolate pin 42 of the cartridge slot. This prevents the 7MHz frequency to enter the cartridges.
Solder a line between pin 42 of the cartridge slot and pin 8 of the VDP.
Only thing left might be the PSG because this mod does not affect the PSG's pitch shifting. That might be quite a bit harder and above my paygrade.
![]()
Below is November 2019
Back to the roots. A Philips VG8235
In 1986 MSX was booming. Very booming. My dad's employer even encouraged his employees to buy the computer of the future with tax advantage. The employee could pick up a computer and pay for it in a period of three years in 36 parts for gross salary. There were two types of computer and two types of monitor and one printer to choose from.
The computers were the Sony HB-F700P and the Philips VG8235
The monitors were the Philips VS0040 and VS0080 in two possible colors fitting with the computer
The printer was a Philips VW0030
Not knowing the difference between the expensive Sony and the cheaper Philips my dad opted for the Philips and the monitor of choice was the green monochrome VS0040. The printer came along as well.
As I never saw a computer from that close before I didn't have the slightest idea what a cripple machine my dad got and how much I would get to hate it.
And soon I would find out since a lot of my school mates' dads worked at the same place and got a computer as well. Where everything I saw at home were 16 shades of green one friend of mine had real colors from the same computer. And the screen was bigger as well. How evil was that?
Then I visited another school mate who's dad knew mine from the job. They had the big Sony and way more games on one diskette than we. True evil showed its face when it turned out he was able to read my disk with games, but I was not able to read his. So single sided and double sided floppy disks were a thing... Oh dear.
It wasn't the biggest problem because the only thing me and my friends knew were small Konami ROM rips which fitted on any disk easily.
In 1990 when I heard there was a guy with the biggest collection living two streets away from us I went there and visit him. It was one of the Genic guys who had a Sony HB-F700P and crates of disks and even some cartridges of which one was an FM-PAC. What marvelous stuff he showed me and how sad I was when I wanted copies. So many Konami megaROM hacks and beautiful disk based games. When I said I'd like a copy of Fire Hawk, I was told it needed a double sided disk drive and when I wanted a copy of Metal Gear I suddenly needed 256kB RAM! Well, so did I, didn't I? It said so on the computer (yes, RAM and VRAM added together cuz that sounds nice).
Deception. Every time I went to visit him I got home with silly MSX1 games because that was the only thing I was able to run on that MSX2. So later, in 1992, when we got a Sony HB-F700P I didn't shed a tear when my dad sold the Philips set, including the green screen.
Back to the future, early November 2019 I had a moment of numb brains and ran into a second hand VG8235 for a very reasonable price and decided to buy it for two reasons. The first being to have back the computer that got it all started and the second to try my soldering skills on. My other MSXes are way too valuable for me and if I blew up the VG8235 nothing would be lost really because it could serve as a static monument anyhow.
I tried finding out the state of the machine, but the buyer could not test it because he had no screen to attach it to. After trying some things which didn't require a screen (does it turn on, does the disk drive show signs of life and what does the caps lock light do?) I was convinced and there it was. It still even played the game my family used to play most of the time.
But the disk drive was toast and made a lot of noise. The belt had turned into gum but that was to be expected and was no problem because the disk drive had to leave anyhow.
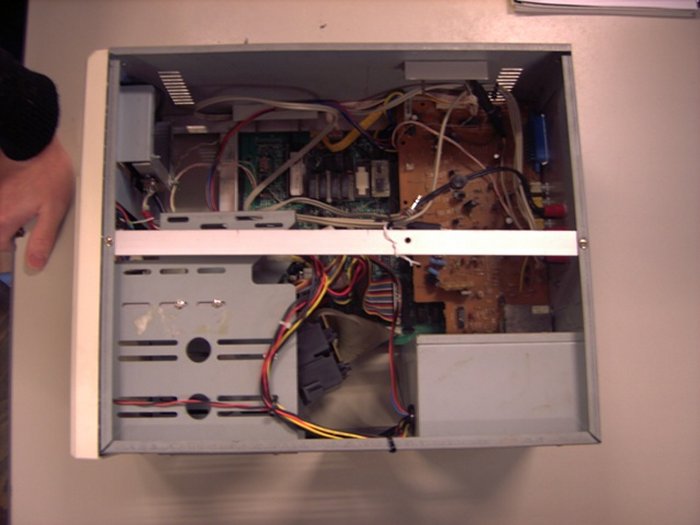
The thing had to be opened and cleaned. Everything got disassembled and cleaned manually and it came out nicely. Though still I get nightmares of my first encounter with the components behind cartridge slot 1. One big array of goatse. Why NEC (who manufactured the VG8235), why?
After removing the disk drive and a little daughterboard this is what I saw.
The first thing I did was remove that time bomb called battery. It only had about halve a voltage left so it was rather useless anyway, but on top of that didn't I want to risk it to start leaking and destroy the main board eventually. Be gone evil battery.
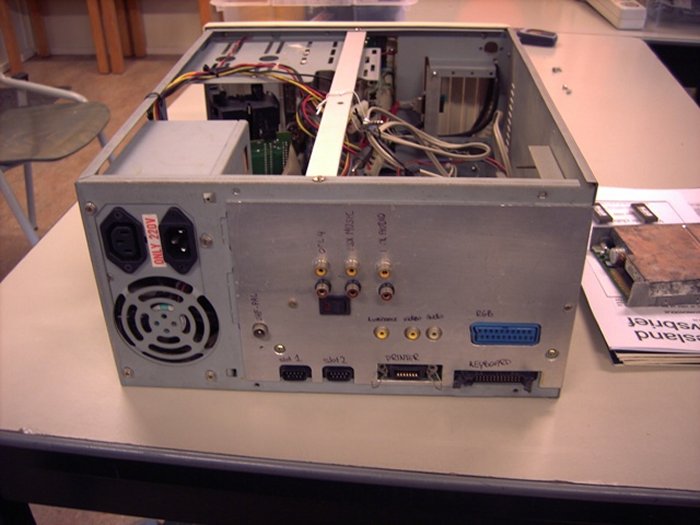
Stuff being done and while at it the scart and joystick connectors got some fresh solder since you never know:
It's a fact that having the right tools is vital so yes... I had to buy some more gear. The de-soldering station was a great device to remove stuff without damaging anything and for the stubborn elements there was the hot air station to convince stuff to really let go.
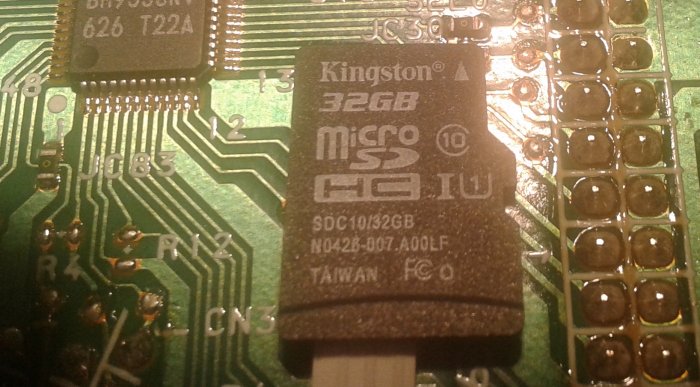
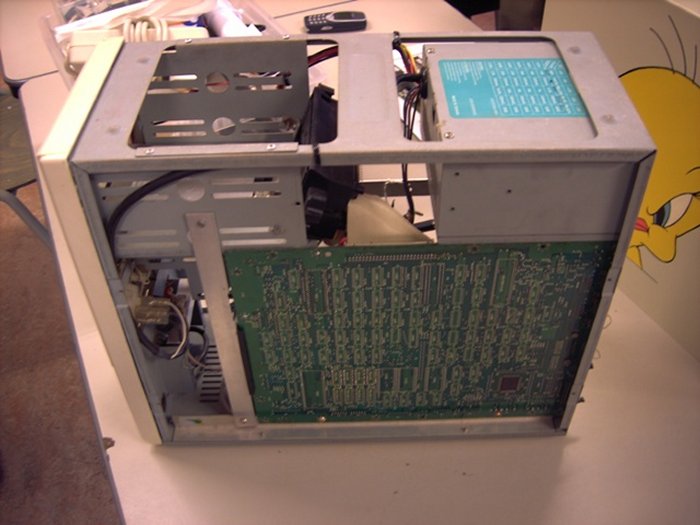
Changing the diskROM and and fixing the main board to understand it was double sided was a walk in the park. Having a cable converter by Omega was quite a nice detail as well so the replacement disk drive could be connected rather easily. But... It was hardwired to be a B: drive. So after some googling I found the "jumper". It's that tiny thing the arrow on the µSD cart points at. And luckily it cooperated at the first try.
I never soldered anything that small before and for now I'm happy that one's done. And hurray, the double sided drive was a fact.
Then there was one thing left: the 256kB RAM. I haven't made any picture of it because it was taking too much of my attention to think of a camera, but it was quite the adventure. Stacking chips and soldering wires between several pins. But after a few tries and finding the right order of soldering it turned out to be not too difficult, but not a walk in the park either. I flashed a DSK with a auto booting ram tester to my MegaflashROM SCC+ SD and booted the bare main board and waited until the test was complete. After the first test I got an error which turned out to be a loose hanging pin of a RAM chip (oh you bad Meits you!). But after that:
After this little project I was quite satisfied I pulled it off. One forgotten and lonely MSX was found at an attic, sold to me, got reanimated and modded without it dying a horrible death!
I might start to like this. I might do it again, and maybe even more again... But I won't keep all of them, but hope to find a new home for them where they can display nice graphics and play nice tunes for the person who still likes MSX.
That crippled, totally not complete, passionately hated computer in the second halve of the 80s turned out to be a very nice device.
![]()
Below is January 2018
Graphics 9000 cable
As I'm helping out the still active guys of I.O.D. with some music conversions for their Amiga to MSX port of Agony I thought it would be nice to watch it on real hardware. As an Amiga is superior to any MSX (audio is debatable) it's not that strange that I.O.D. set the system requirements high. In fact, as high as possible. You need to plug a Graphics 9000 and a Moonsound into your turbo R and will need a flash device to put the quite big ROM on. So add a slot expander to the list.
I have everything it needs, except for the Graphics 9000. I never felt the urge to buy one as I didn't believe in it. In retrospective I don't think I was wrong. It cost quite a few back in the day and software didn't exist. And who could prove me that there would ever be software at all? Nobody. A few people tried, did a little trick and spread it, but nothing serious until somewhere in 2016/2017 when a few games popped up. Check the picture above. Indeed, 1994/1995. So no, I never missed one.
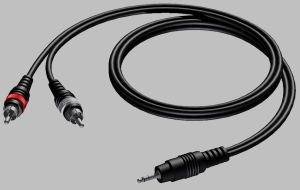
But then was then and now is now. The past 24 years I could live without and now I do music for a game that supports this device. Thanks to a friend who has one (and hasn't used it since he bought it because of, well, lack of anything to run) I now can watch Graphics 9000 stuff. There was just one little "but": No cable. "You have a soldering iron and it's your new hobby. Make a cable yourself and I'll buy it when you return the cartridge." Ehm okay. So I started digging in my cable crate and found me a nice VGA cable and a scart cable. I thought I was halfway there. Then it turned out I hadn't looked well enough to the Graphics 9000. It's not a VGA connector, but a SUB-D 9, just like a joystick. Ah, so I took a serial PC cable and cut off the plug where the scart should be... Damn, only 4 wires... This meant I had to make a cable from scratch. Now I do like some basic soldering with simple through hole capacitor/resistor stuff, but cables? Not at all. Those wires are always all over the place. Now I do have some very useful clamps, but still.
I did search the net for information on this cable, but was only able to find the Graphics 9000 side of the cable. Since I'm not too confident in the world of electronics I asked OmegaMSX where to put the wires on the scart side. His reply made me make the cable without expected setbacks. Therefore I present you the complete cable below with on the left the pins of the SUB-D 9 and on the right side those of the scart.
1 (GND) -> 5 and 9 (make a wire bridge there)
2 (GND) -> 13
3 (RED) -> 15
4 (GREEN) -> 11
5 (BLUE) -> 7
6 (STATUS RGB) -> 16
7 (CVBS) -> 20
![]()
Below is October 2016 - March 2019
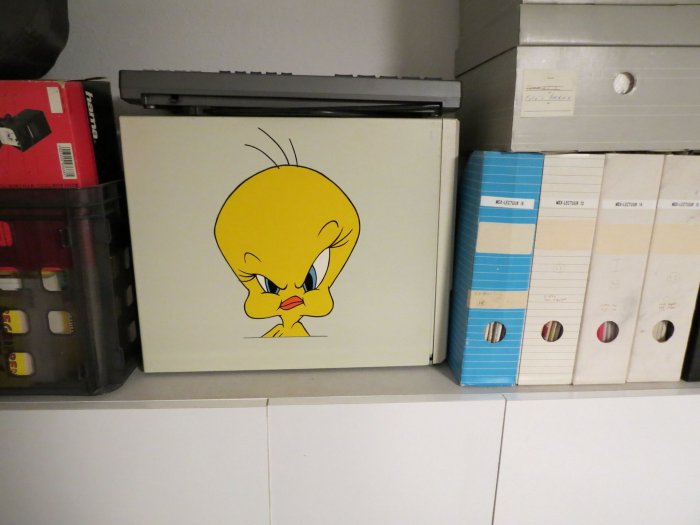
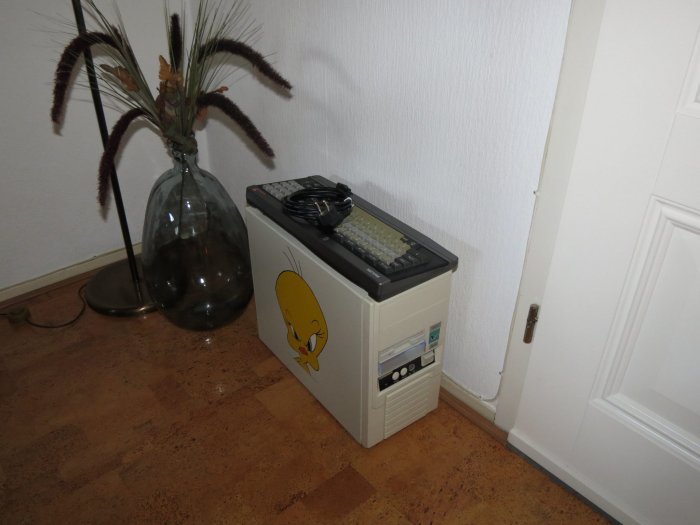
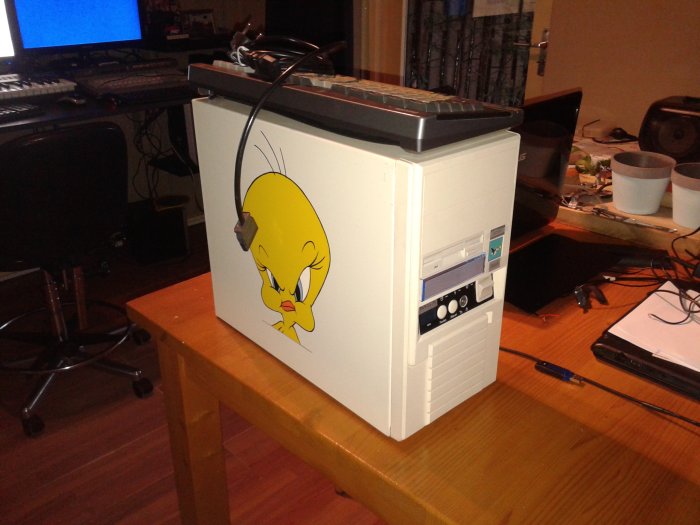
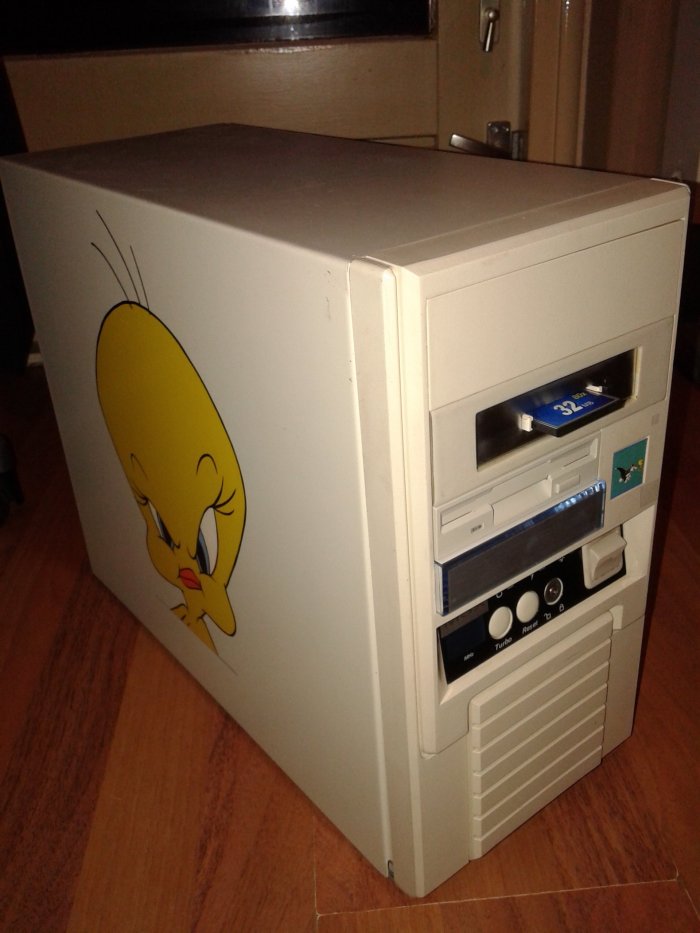
Tweety is back home - The diary

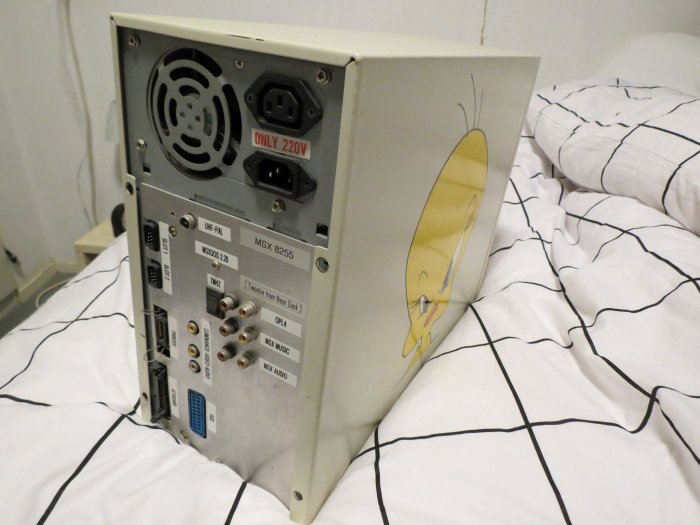
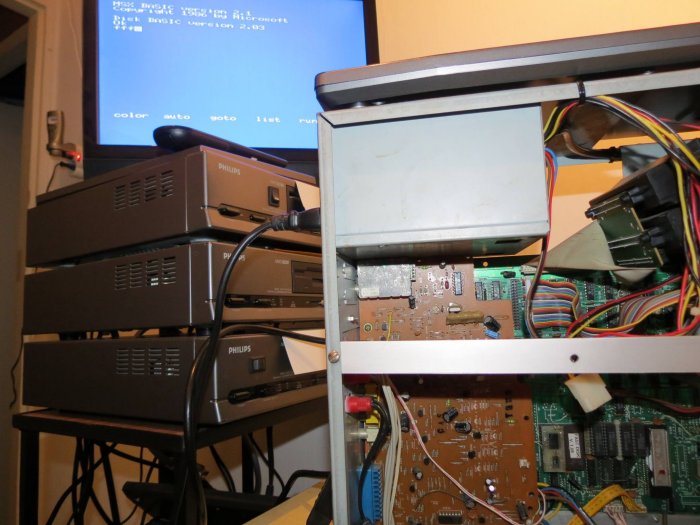
It must have been around 1995 that I bought a PC case which was modded to house a Philips NMS8250 MSX2 computer by fellow club member and hardware technician in the north of Holland for HPN (Hardware Partners Nederland) Jeroen Haisma. I did have such a computer lying around and decided to have Jeroen mod this machine as much as possible. In the end the case housed the following:
- Philips NMS8250
- MSX-DOS2.32
- 512KB RAM
- 192KB VRAM
- 7MHz
- MSX-Club Gouda slot expander 5.0
- MSX-Club Gouda Novaxis SCSI interface
- MSX-Music (7MHz adaption)
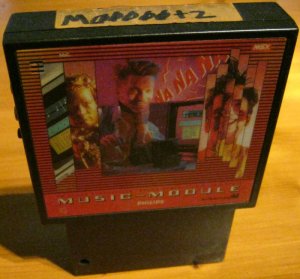
- Philips Music Module (256KB Sample RAM, 7MHz adaption, Amplified)
- Sunrise Moonsound 2.0 (256KB Sample RAM)
- 20MB SCSI hard disk (must have been a western digital)
- 40MB SCSI hard disk (must have been an IBM)
- 1 double sided disk drive
A friend of mine painted the head of Tweety on the left side of the case.
At the end of 1997 I left the MSX scene and had this computer lying around. It was used to play some games or play on the Philips Keyboard which was connected to the Music Module.
It was idling until summer 1999 when I was invited to play keyboard in a local black metal band. I joined them until the CD they were planning got released. Later that year I met Kier Kracht in a computer store in my town. Knowing him as a very enthusiastic MSX user I proposed him to buy this machine. Since I needed some small handcash to buy some tobacco I proposed a price which he couldn't refuse: Fl 25,- (some € 12,-) for the MSX in PC case (I removed the slot expander and its contents and the hard disks). Kier accepted and drove with me to my parents' house and collected the machine.
I went to the petrol station for some tobacco and felt good. I just built a PC a few months earlier and was playing around with that anyway.
My friends heard about the sale and didn't really agree. I also heard that the Tweety painter wasn't really happy, but I never heard him say it himself. The following years I started feeling bad about the sale. Especially in 2003 when I decided to go back to the MSX scene. I had a bare 8250 with some musical cartridges while I could have a race car of an MSX2. One of my fellow Near Darkies hinted me a few times to contact Kier to request a buy back, but I always refused as that felt weird.
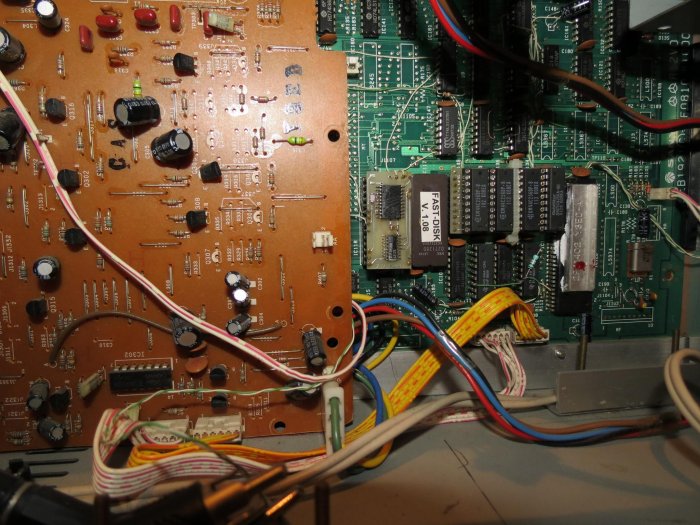
17 years passed and all out of the blue Kier asked me if he was allowed to bring back Tweety. You can imagine how happy I got. Two days later the machine was back. The 8250 which was built in wasn't the one I really wanted and the one I wanted in was still in its original case. To help me out with the steps I don't really dare performing myself I requested the help of OmegaMSX to do some soldering. In return he got to take the old, modded mainboard back home and give some purpose to the v9958 he still has lying around.
The goal is to build the following:
- Philips NMS8250
- 512KB RAM
- 7 MHz
- MSX2+
- MSX-Club Gouda Slot expander 5.0
- Sunrise IDE/RS232C interface with an internal master CF cart and an external
slave in a 5,25" bay.
- MSX-Music
- Philips Music Module
- Sunrise Moonsound with one MB RAM
- Cartridge slot 2 routed to a 5,25" bay
- 2 double sided disk drives
Below some pictures:
 Tweety
used as a synthesizer in a black metal band with a Philips NMS1160 as a keyboard
controlling a Moonsound. (summer 1999)
Tweety
used as a synthesizer in a black metal band with a Philips NMS1160 as a keyboard
controlling a Moonsound. (summer 1999)
 The
old Meits cave where Tweety is being used to study songs for the band. (summer
1999)
The
old Meits cave where Tweety is being used to study songs for the band. (summer
1999)
Tweety in Marienberg. (2006) (photo taken from MSX Worldwide)
Tweety in Marienberg. (2006) (photo taken from MSX Worldwide)
Tweety in Marienberg. (2006) (photo taken from MSX Worldwide)
Emil Sokolowski's hands entering Tweety. Kier Kracht and Abi van Tamelen see it happen in Marienberg. (2006) (photo taken from MSX Worldwide)
October 2016
Below some pictures by Kier Kracht, the day before he brought Tweety home again
(october 2016)
Tweety on a shelve.
Tweety on a bed(?)
Tweety's internals.

Almost the same picture.
Kier Kracht owns a Dymo labelwriter :)
Tested and working.
Ready to be shipped.
Below are the pictures of Tweety being back home again and getting some major
TLC.
Hi. I'm Tweety. Remember me!?
Plans being remade.
A close-up of the plans. It's good to see some aluminum bars remained. The slot
expander won't be able to touch the mainboard and the music module has nowhere
to go.
A 3.5" to 5.25" converter is inserted to hold the CF-reader in which the slave
card can be inserted. Above it the internal cartridge slots are visible. One of
them will be extended to the front and go below the CF-reader.
The CF-reader is inserted in its bracket. It just needs to be connected and get
a lick of paint.

A bracket to hold a cartridge slot has been made.
Some new parts arrived.
This cartridge slot extension cable comes from Rinus Stoker. It might as well be
the same one that was used in the 90s to connect the Music Module to the
slot expander.
This cartridge slot module was bought from Bas Kornalijnslijper. The right part
will be used as the external cartridge slot.
And I went on casemodding.
Now a cartridge can be inserted. It's not connected yet, but it can be inserted.
Today the new mainboard has been placed. The analog board will remain as it has
been shrunk a bit in order to fit between the PSU and the bottom of the case. As
this board hadn't been modified for MSX-Music I gathered some courage to
perform this modification myself. Optical it looks like I succeeded.
Now the next part: assemble it as far as possible to have it work as a basic
MSX2+.
The cut analog board which just got the sound mod is to the right. It's
clearly visible the bottom part got cut off to fit between the PSU and the
bottom of the case.
Compact Flash busy led wires.
Up close photography with a smarthphone doesn't work as expected, but in the
blurry back you see the wires to which I soldered this side end up in the front
LEDs.
As the Compact Flash readers both have a LED connector, this was just a mandatory step
to take.
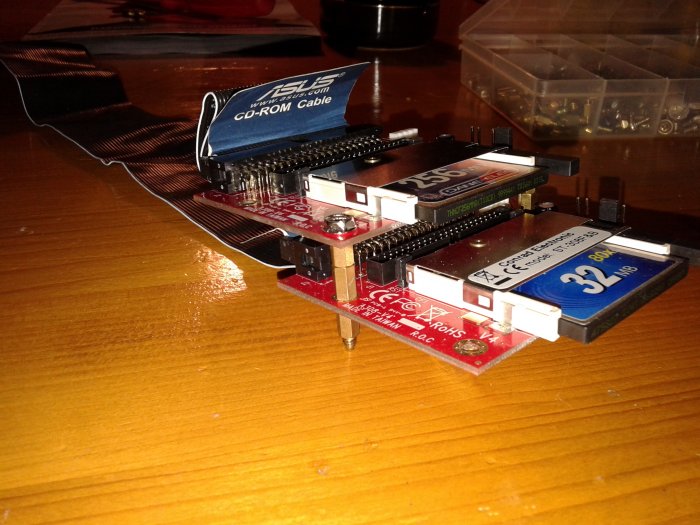
The mailman brought me a Compact Flash card reader today. Since the 5.25"
bracket is still at the painter I did a little test setup. It turns out they can
be stacked.
Below is the slave which will be accessible through the front of the case and on
top is the internal master card. Now I've to wait and see if all fits inside. I
have good hopes :)
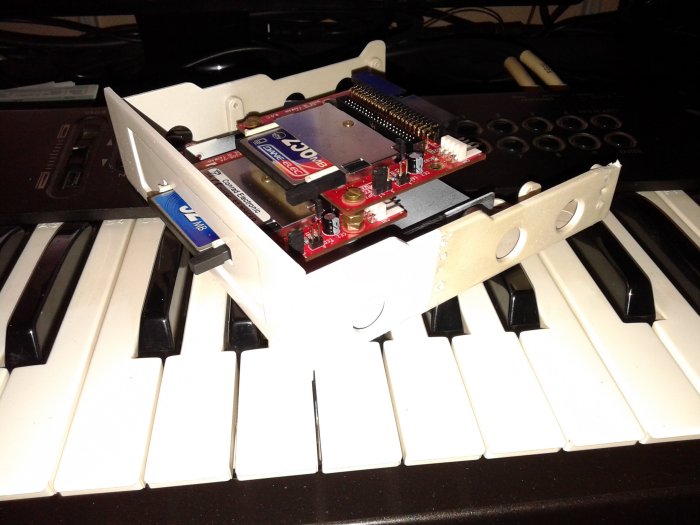
The double Compact Flash reader is put in its bracket, which in its turn is put
in its bracket. The one on top is the master card which will not be accessible
from the outside. The one below is the slave (and you can see it's accessible).
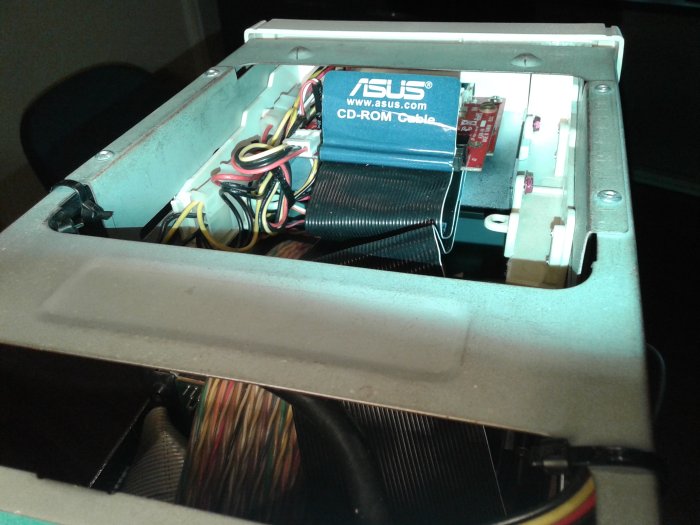
It's starting to get a little crammed there. But it will get worse.
This is starting to look like MSeX.
Today I fired up Tweety for the very first time in its present config. As I
connected everything the right way and was sure there were no alien parts or saw
dust from iron or any dust in general I was sure everything would work out just
fine. But after pressing the button, there was no magic moment.
After some testing it turned out there was only 10V on the 12V line. The -12
volt line had the same deviation. Very pitiful, but I can't blame a PSU from
1993. I've seen a lot newer ones blow.
Now I'm out to get me a replacement PSU, a brand new one. And the first thing I
do with it is void the warranty to make it switchable like the old one.
Hobbies don't always go as easy in real life as on hobby TV.
December 2016
New parts have arrived. Two breadboard cartridges, two 50 pins ejector edge connectors, a white disk drive, a new PSU and some adapters to get the right connectors to the new PSU.
- Cartridge slot 2 which is in the front of the case has been connected and
tested.
- My Sunrise CF interface has been traded against a Sunrise IDE/RS232c
interface.
- A black disk drive has been traded against a white disk drive.
Some parts need to be ordered abroad since they're not available anymore in the regular electronics shops, but all is in and most has been assembled.
One breadboard cartridge has been put in the internal cartridge slot 2. It received an ejector connector and a 50 pins ribbon cable to be connected to the external slot in the front. There is a twist in the cable to have the cartridges inserted with the label side up.
A second breadboard with the same connector got a ribbon cable to connect the music module to the slot expander (see the situation in the picture above). Unfortunately there was an "error" in the design of the breadboard which mirrored the pin rows up side down. This became clear once the cable got tested in a live situation. Luckily the short circuit didn't destroy anything.
This is how the beast looks right now. Everything you see is functional. Unfortunately there are so many cables which are hard to manage. In the end it will look a bit better, but it will never be pretty.
A few more things left to do are:
- An FM-PAC in slot 3 (front) of the slot expander. This one is now being down
amplified.
- A cartridge slot extension cable from slot 1 of the slot expander to the music
module.
- The second disk drive needs some juice and data cable.
- The led panel on the front needs some new solder as the joins are a little sensitive for movement.
- The analog board needs some revision because the video output is a little dark.
It would have been more handy to put the extension cable for the music module in slot 0 of the slot expander, but this is impossible because that's the only slot where the IDE/RS232c interface fits.
The machine has been tested in its near to completion state. The analog board has been swapped for another one to get rid of the dark image. It boots well from Compact Flash and the image is perfect. One thing that didn't work as expected are the busy LEDs of the Compact Flash cards. Both have their own dedicated LED on the front panel, but both LEDs flash if one of the cards is in use. Pity, but I can live with it.
This is a video of Tweety's present state. You can see where some parts are still missing.
April 2017
There was a strange envelope in the mail today:
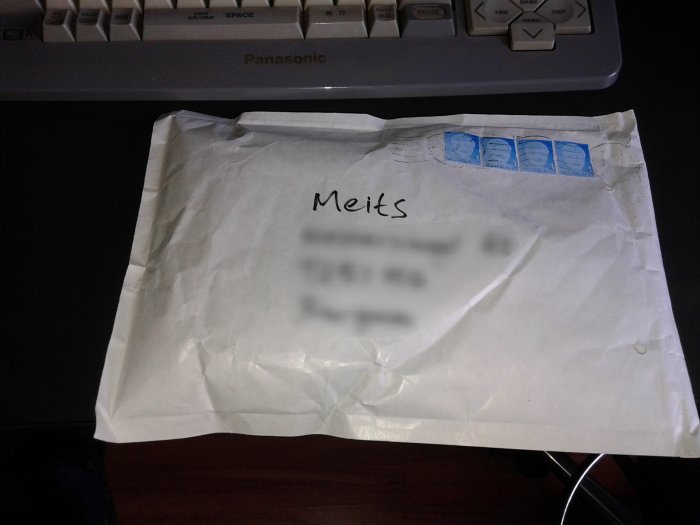
This was the fun of the day, but the contents were even more fun. The down amplified FM-PAQ and the slot extension cable for the Music Module were inside it. After sawing a cartridge case to fit around the breadboard of this cable I put the final parts in the case and now it looks like this:
Now some credits and thanks where they're due:
- Jeroen Haisma for preparing this case in the early 90s
- Marcel Houkes for the beautiful artwork
- Kier Kracht for taking good care of Tweety while it was away and returning it
home. Eternal thanks.
- Bas Kornalijnslijper for the modded Philips NMS8250 and the extra cartridge
slots
- Eric Boez for the breadboard cartridges and the FM-PAQ
- Rinus Stoker for the cartridge slot connector on the extension cable
- Tristan Zondag (OmegaMSX) for some high skilled soldering work and trading parts
Future plans might involve:
- HDMI output as there is plenty of room behind the music module to house a
RGB-HDMI converter.
- PS/2 keyboard connector as I still have an interface for that lying around. I
just lack a cartridge slot for it.
- PS/2 mouse connector while we're at it.
Case closed

January 2018
Tweety is fixed. There were some loose solder joints and a short circuit. Thanks to OmegaMSX for finding and fixing this.
A little later in 2018
Tweety got back home but still turned out to have a loose solder joint where the cartridge slots are connected to the mainboard. Luckily I was able to find and fix this myself.
Again a little later in 2018
A fellow Darky decided it was time to part with his MSX hardware so I bought the
whole collection for a bargain. Some stuff I kept and some stuff I sold. The
stuff I sold covered all the expences I made so the leftovers were free. Some of
it went into Tweety:
The MSX-Club Gouda slot expander 5.0 made place for a HPN 4+2 slot expander of
which the extra two slots are I/O slots.
This slot expander took the space which was needed for the Philips Music Module,
but fortunately there was a Toshiba Music Module in the loot as well. This one
has all the available expansions on board. But since it went into an I/O slot
only the basic functions (music+256k sample ram) are available. ROM and
MSX-Audio BIOS can't be used in this configuration. This music module has a
smaller form factor and could therefore be placed straight inside the slot
expander.
The second I/O slot received the "free" GFX9000 which was in the loot and a
MegaFlashROM SCC 512K (a homebrew abused Konami game) found its way into the
slot expander as well.
The new situation required a few switches and connectors on the outside. Now there was a hole on the back plate where there used to be a switch somewhere in the past. The GFX9000's connector went there in stead. And since the MegaFlashROM SCC needs to be switched manually and the switch on the cartridge is impossible to reach when the case is closed I decided to lead all the slot expander's switches to the front of the case.
That would have been it, but as always I ran into something I overlooked before. When I tried to use the Toshiba Music Module nothing happened. Not knowing for certain where to look but knowing it has FRS's MSX-Audio expansions I decided to ask him. His tip was golden: a pull-up resistor on the slot where it's in did the trick.
March 2019
Some things just don't want to remain just good. The Moonsound's lead to the back side of the case turned out to have a bad ground making the audio output mono. I'll fix that some time later. It's all good for now.
Pics will follow. Tweety's big dug in a bit.
June 2019
A few clickable pictures of Tweety's current state. A new slot expander is inserted with from front to back:
Panasonic FM PAC with English firmware and an audio out to the back of the case.
Sunrise Moonsound 2.0 with 1MB sampleram with the audio out to the back of the case.
A MegaFlashROM SCC 1.0 with a 512KB flashrom on it. As you can see on the front of the case there's one switch pointing down. That's the MFR being switched off.
A Sunrise ATA-IDE/RS232C interface with the Compact Flash readers connected.
A Toshiba Music module with all possible mods in the first I/O slot with an audio out to the back of the case.
A Sunrise GFX9000 1.0 in the second I/O slot with a video out to the back of the case.


November 2019
I was worried my prettiest keyboard was broken, but all spare keyboards had the same issue. It turned out the connector on the main board had a few cold solder joins. They got some new solder and again a hidden "flaw" was sent to history. The last killed gremlin were the pretty dirty cartridge slots which didn't recognize every inserted cartridge. I cut a piece of normal printer paper to the size of a bank card, sprayed it with Isopropanol and pushed it in and out of each slot repeatedly. Seeing how black the paper came out showed me how much it needed to be done. I chose not to use kitchen paper because I was a bit afraid it would tear off and stick in the slot. This method worked a charm.
Now Tweety, please stay all right now.
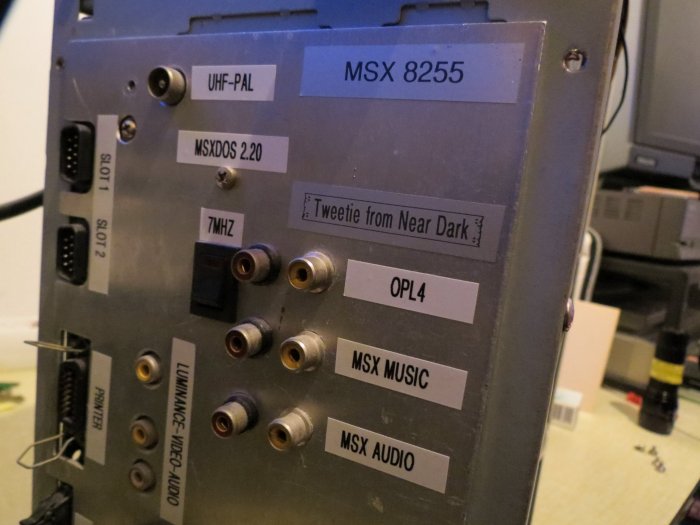
May 2021
Today I think Tweety has reached the near perfect state. The hood goes up for the last time... Hopefully.
A while ago I fixed the cartridgeslots to 3.5MHz to have the audio cartridges' audio output stay unaffected of 7MHz shenanigans. For that I isolated the slot assemby's clock pin from the board and connected it straight to the VDP's clock pin. This pin was isolated from the board when the 7MHz board was installed.
All sounded really well, though after a while I did hear some pops in the SCC audio when the machine was put in 3.5MHz mode. Now that was very odd. And very unacceptable. The fix for this was a switch on the backpanel to switch between the VDP's clock and the 7MHz board's clock on the clock pin of the cartridgeslot assembly. In short: A switch to switch the fix on and off. And it turned out very well.
Now a somewhat really odd and complex story.
Years ago I bought an audio mixer especially for Tweety. Just to be done with cable plugging all the time. However, this mixer found another purpose and left Tweety without. Until last week.
Earlier this year a guy who wanter to play 1942 MSX2 on his Panasonic FS-A1WX and WSX found out that in game there was no joystick support. That was weird, so I wanted to check if that was the case here as well, since openMSX supported joystick input on both systems.
It turned out my WX did not support a joystick, but the WSX did. And that's where I became curious. Manuel Bilderbeek of the openMSX team became even more curious.
The MSX2+ machines by Panasonic have a Toshiba T9769 engine. The FX and WX can have the A or B revision and the WSX can have the B or C revision. So I assumed my WSX has the C revision, since that's in the turbo R as well and joystick is supported on turbo R as well.
Manuel wanted to be sure, so heck, I disassembled my machine and saw that I indeed have a T9769C engine. The machine was reassembled and put back on its shelve.
A few weeks before writing this some guy in my neighborhood wrote an ad that he was looking for retro computer gear. I tried to sell him my Sony GVM-1400QM monitor. It does have some issues I can not fix and it's as heavy as a tank, so there's no way I'll ship it anywhere. So if anyone wants to buy it and pick it up, please do so. Before I contacted the guy I checked its status and connected my WSX to the monitor. This monitor has a D-SUB25 RGB connector, so I made an adapter for that. I turned on the computer and nothing happened. Turned out there was a loose pin in the female scart connector shorting stuff. I got the loose pin out and tried again: No luck. WSX was dead. I connected a WX and the screen turned out to be the same as I saw it last time: slightly tilted yoke, a bit off center and a bit jumpy.
The guy didn't want the screen and my WSX was dead... Or did it die when I checked the Engine model?
Eitherway. I contacted Omega to help me out finding the dead component(s) in my WSX. In order to do so I bought a logic probe. All traces of death aimed at the gate array chip. That sucks because it's quite a unique chip. Now I do have a spare WX with some issues with the FDD controller which serves as a donor, but I'd rather not scavenge a gate array out of it if there's another way. So I contacted my MSX2+ supplier Daniel Correa who sold me a spare/junk mainboard with the chip on it.
Now what has this elaborate story to do with Tweety you might ask, cuz damn, this is a TL;DR if I ever saw one.
The gate array chip is a 100 pin quad flat pack IC which is in a scale I can't solder yet, so the swapping process has to be done by a pro -> Omega -> needs shipping -> needs box -> I don't have a box -> I bought a new audio mixer of a size that a suitable box for shipping the WSX would be necessary. And yes, I have a box and a new, big mixer came with it. And thus Tweety has its own mixer now.
Now that Tweety has its dedicated mixer it still needed one extra audio output on the back for the SCC. To get the SCC audio to the back the SCC cartridge itself needed an audio output as well. This cartridge is a MegaFlashROM SCC with a 512KB flashchip where the original Konami ROM once was plus a switch to enable/disable the ROM. This switch is not necessary in Tweety since there's a switch for the 4 regular slots on Tweety's frontpanel. The switch was removed and an RCA connector was placed.
All five audiosources in Tweety (PSG, SCC, MSX-Music, MSX-Audio, OPL4) have their dedicated connector on the backpanel, and to ensure nothing of the cartridges would bleed into the PSG's connector I cut pin 49 of the cartridge slot on the main board.
What an adventure. Expect a demo Youtube video here some day.
![]()
Below is December 2014
TRON in a graphical screen
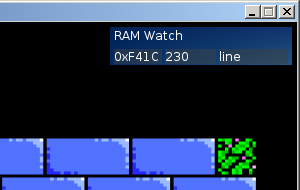
A little thing I ran into while doing some coding for Near Dark's forthcoming music disk dIIIsk was not knowing exactly what was going on when the whole thing stalled while testing. Pressing ctrl+stop gave me a Break in a certain line number, but there never was something noticeable to be the cause of it. A running program always goes from line to line and command to command. The break always leads to a place within the endless loop.
In screen 0 and 1 there is this handy little command TRON which prints the current line number on screen so one can keep track of the code while being executed. The screens above lack this.
On a real machine you're stuck for that matter, but openMSX with all its flexibility should give an answer to that with all its openness... And so it does.
I went to the openMSX IRC channel and asked my question on which coder MTH came with the following solution:
In the console type the following:
ram_watch add 0xF41C -desc line -type u16 -format dec
A little overlay will appear in the right top corner showing the line current number... Your TRON in a graphical screen.
![]()
Below is May 2014
A little update
I've been away for quite a while. So here's a tiny update for now.
In January I've been visiting an MSX fair for the first time since ages. Nijmegen was the place to be. I haven't done much more than just filming the fair with a HD cam put on a tripod and met some people I hadn't seen in ages (or ever at all).
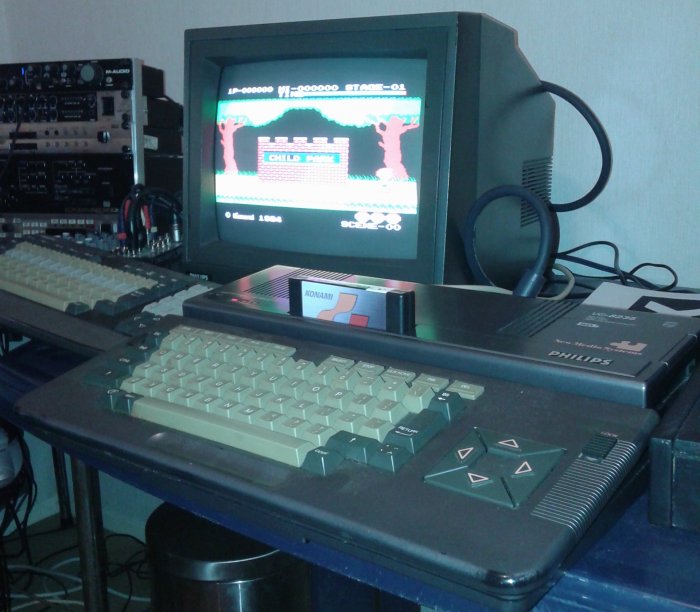
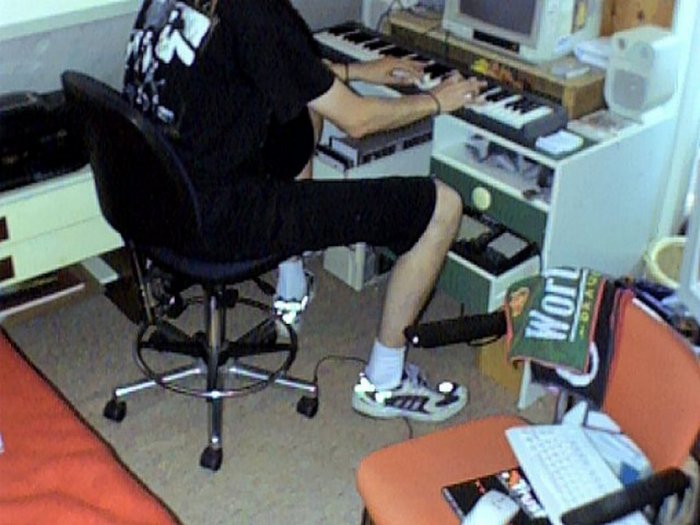
The reason I went there was the fact that I wanted to have a Playsoniq device. More on this cartridge in the Equipment menu. It's just that I had to go home without a unit since the batch Supersoniqs had with them were a) untested and b) totally nude. So I just ordered one and received it a few weeks after the fair.
I met up with WORP3 for the first time. They showed Orbit, demonstrated MIDI-PAC and the intro demo of their SD Snatcher conversion for SNES. Unfortunately this project got cancelled because Konami changed their mind. Not being able to release anything of this game, they thought it wouldn't hurt to show the intro demo in the state they left it almost two decades ago.
I had quite a long and interesting chat with John Hassink of Trilobyte showing me a lot of nice tricks and facts of their SCC tracker called Trilotracker. If I ever feel like doing SCC music this will be my tracker of choice.
From Bas Kornalijnslijper I bought some cables and a B: disk drive for an NMS 8250 computer. It's not that I use this otherwise totally default machine, but it's just possible to insert a second disk drive in it. Reason enough ;)
In the meanwhile my Sony HB-F700P MSX2+ machine died on me. I didn't use this machine anymore, but I was attached to it. It had MSX2+, 7MHz, 60Hz default (so no vdp(10)=0 crap for me) and a memory counter (so not just 128kB VRAM displayed at the boot logo). I sent it back to its maker, Bas Kornalijnslijper. Since all the checkable things were still in good condition, the thing was declared dead. I traded this broken machine as spare parts donor to a Philips NMS 8250 with two disk drives, MSX2+, 7MHz, 512kB RAM, enhanced PSU and modified MSX Music/SCC sound handling. Although not used that often, it's on stand by.
My donor Panasonic FS-A1WX lost its space bar stabilizer bar to my turbo R and the slot 1 lid to a friend's turbo R. Then there was this discussion about porting Super Mario World to MSX which had some bugs on this very machine. When Daemos, the maker stated he'd be willing to check it out on a real machine next January I decided to send this donor machine to him to use it as test machine. Next to just testing his game, the bloke tried to fix this machine as good as he could. I didn't mind ;) Unfortunately the disk controller had died, so it won't be having a disk drive ever again. So he closed the disk drive bay. The stabilizer bar of the space bar got remade and placed and the given away slot 1 lid as well. On top of all that he expanded the 64kB RAM to 256kB. Ah well... Anyone other machine you want to lend?
As my second step down converter died while in use of my MSX turbo R, I had it with this step down stuff. I sent my machine away to Erik Luppes to have its internal PSU replaced by a 220 volt one. And while at it, have its RAM doubled to 512kB. It turned out that my filled slot expander is consuming enough power to have the original PSU already show two melting spots as well. So if it weren't replaced, it would've probably died somewhere in 2014.
Then there was my broken PS/2 keyboard interface which I bought when I only had a Sony HB-F700P with a clumsy keyboard. As I don't like to have broken hardware I asked Worp3 to try and fix it for me. He did so and even gave this naked cartridge a casing. Darn, this was appreciated.
Quite some stuff happened. It's just that I didn't feel like updating my site all too much. I've to update my equipment menu now, make pictures of new hardware and such. Ah well, see ya...
![]()
Below is December 2013
PC Soundcard issues
Back in the days of Windows XP life of a musician using the line in of his soundcard was rather straight forward. You selected the source in the simple sound mixer and it recorded just that. Above all that, things were played back without audible latency. So playing the keys of a connected synthesizer was like playing it like it was connected straight to a set of speakers.
In this period I bought a quite enhanced soundcard, a Sound Blaster X-Fi Platinum Fatal1ty:
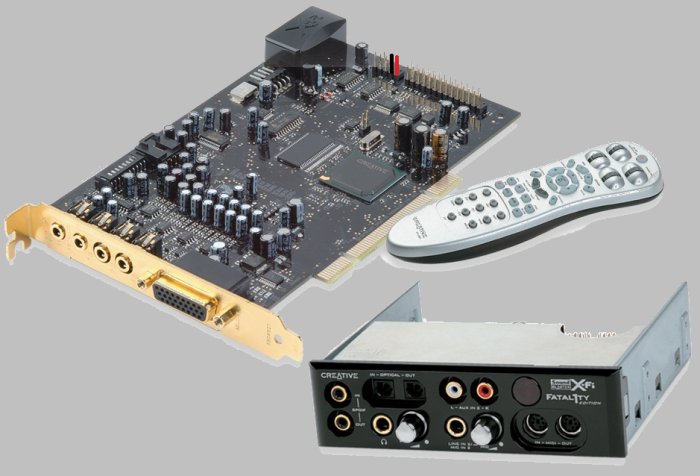
A beast, I say. The 5 1/4" I/O drive was really handy. Connecting anything to the line in with some RCA plugs, a synthesizer in its MIDI ports or a set of head phones... Name it and it was there.
Then Windows 7 was released and shit hit the fan. As it turned out Creative wasn't the supportive type when it comes to drivers, it took a while until the thing got supported. Third party drivers of PAX and Daniel_K were the solution. Months later Creative finally released their official drivers. Sad.
Anyhoo... When the X-Fi was finally working fine with Windows 7 something really odd showed up when I wanted to play something manually with my synthesizer keyboard. There was latency. This was quite a shock since my computer was fast and my soundcard was fast. Googling around with a search string of "windows 7 microphone latency" (more people use a microphone than a line in) gave the answer.
I'll show you how to a little later in this article.
In 2013 my X-Fi began showing signs of slowly breaking down and after having my computer cleaned with compressed air it was never to be recognized again by any computer. Luckily a computer shop next door had some old loose cards in an old box and I got myself a SB Audigy 2 ZS. This card was from an older generation than my X-Fi, but at least my I/O drive worked well with it. I was happy... For a few days... Yep, the thing broke down...
I had it, so I ordered a brand new Sound Blaster Recon3D Fatal1ty Champion

As you can see there's some similarities between the good old X-Fi and this new... thing...
Creative's I/O drive had a make over into something cheaper, but as I didn't use any of the missing connectors on my old I/O drive I didn't care a lot. What I do care about is this latency issue that popped up in the past.
Here's how this latency of 0,2 seconds looks and sounds like
For probing a sound this isn't the end of the world, but when playing a tune you will go wrong for sure. It's confusing as hell. So I tried to do the trick which worked on every sound card before this one in Windows 7.
Right click on the little speaker in the sys tray (in the clock area of your task bar that is) and chose (I got a Dutch Windows) Opnameapparaten.
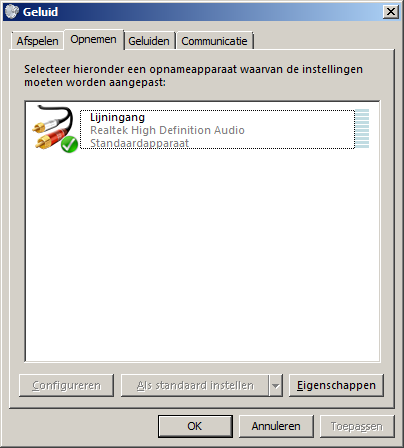
Double click on Lijningang, go to the Luisteren tab and uncheck Naar dit apparaat luisteren.
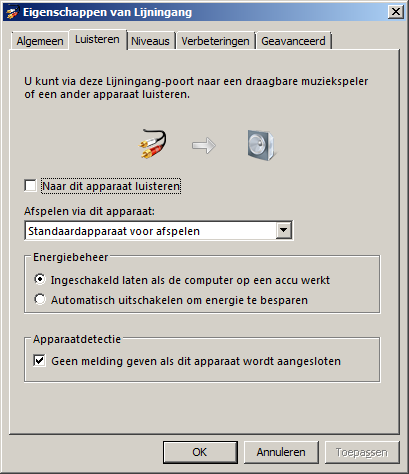
Clik Ok and go to the Afspelen tab.
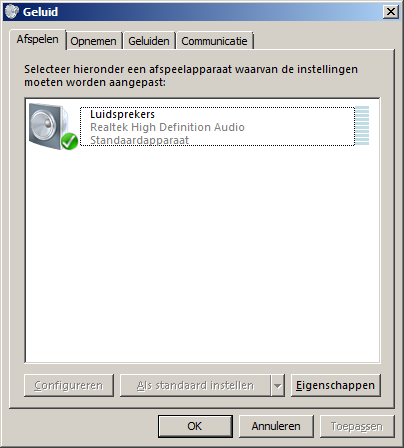
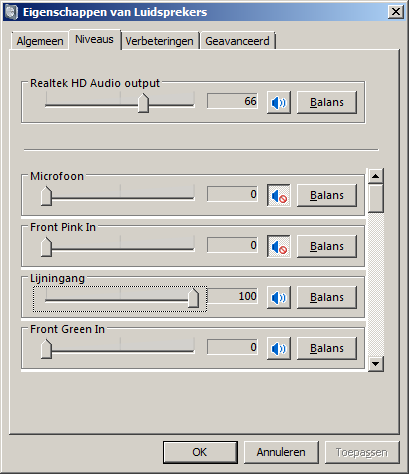
Doubleclick on Luidsprekers, go to the Niveaus tab and unmute Lijningang to 100% (or lower):
Click Ok and away is the latency:
The above is illustrated using the onboard Realtek sound card on my computer's main board. When trying the same technique on the Recon3D, with or without driver only install, here's how the last step looks like:
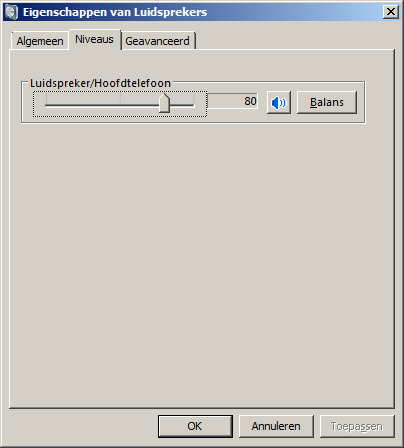
As you can see there's no way to unmute Lijningang. I tried every option, checked several drivers (older, newer, third party), part of Creative's driver bloatware called Trustudio. It's just simply impossible to fix this issue. Therefore this sound card is the biggest mistake I've made in years.
It's still in my computer, yes, but it's on idle as my onboard card behaves way better :(
![]()
Below is Oktober 2013
An MSX Trubo R

I've always had something against all in one computers. By that I mean computers which have no separate keyboard. Keyboards always die and when built in you run kind of a risk. That's the main reason I always had a Philips NMS 8250 or a Sony HB-F700P.
A few years ago I bought a Sony HB-F700P modified to MSX2+ with some other extra features built in, but unfortunately the beast had a few minor issues I couldn't live with. Switching the 7MHz button was not the best thing to do when turned on... The machine could freeze... Well, at least in my situation since I had the thing crammed with loads of external hardware. That might have had something to do with it, but I don't know and can't test it since it's lend out.
Though, I was kind of hooked up with the MSX2+ idea. Not so much the use of it, but just the "have" of it that I didn't really want to let go of it. Luckily I found two Panasonic FS-A1WX MSX2+ computers just a few miles away from here for, as we say in Holland, an apple and an egg... Both had some issues, but it was quite possible to build one good unit out of both and that machine serves/served me well. Serves because I still have it and served because it's lying in a drawer of my desk... With a turbo R keyboard...
Everything goes as a charm in this house concerning MSX, as long as it's an MSX2 haha.
As I got used to the WX, I also got used to a turbo R since they're in the same case, so when I accidentally stumbled across a unit that was for sale for a reasonable price I just couldn't refuse... For the first time since the bloody thing roled off the assembly belt in Japan...
I bought the machine from an MRC forum user from Spain for 1/3 of the price the can go on ebay (ebay is overpiced when it comes to MSX items) so I didn't think twice. The machine was paid and a few days later it arrived.
Here be the unboxing... Something some people always tend to film... Well, I filmed this one... For fun...
After all these years an MSX turbo R was lying on my desk and it still looked fairly nice concerning its age. Look at the picture below:
But there was a catch... The space bar's iron bar to keep it balanced was missing, so the button has to be pressed exactly in the centre, and that's not the way to go. Fortunately I still had one 100% functional keyboard in one of the WX computers, so the keyboards got swapped... And boy, does that look nice...
I already had some keyboard problems in my MSX2+ period (see below), so I wasn't unfamiliar with this swapping trick. But I must say that the WX looks a bit odd with the grey keys...
Some day soon I guess I should try to disassemble my not so well functioning WX keyboard and try to get the iron stabilizer bar from underneath its spacebar and try transferring it to this grey set of keys so I have two great MSX computers...
![]()
Metal Gear 2 - Solid Snake on MegaFlashROM SCC+ SD
To play Metal Gear 2 - Solid Snake on your MegaFlashROM SCC+ SD, you need to switch off the internal slot expander. Some might found out that the game "just doesn't work". Well, it does... See below how:
A:\>OPFXSD MG2_SS.ROM / U
Might be helpful...
![]()
Below is September 2013
MSX Repository update

Lately some people sent me scans of games and a co-Near Darkie brought me some games to scan. I did have to buy me a scanner for that though because my old scanner added a lot of noise in the scans. So I went off to Oké PC where I found out that a flat bed scanned was more expensive than a printer with a scanner on top O_o
Here's a list of scans I received:
1. Play Ball III by SD Snatcher alpha
2. Laydock (Japanese) by Sandy Pleyte
3. Laydock (European) by Sandy Pleyte
4. Eggerland Mystery by David Heremans
5. Super Laydock Mission Striker (Network version) by Sandy Pleyte
Then I got some games I scanned myself from Wouter de Vries
1. Metal Gear (European version)
2. Androgynus
3. Topple Zip (MSX2 version)
4. The sticker of R-Type (added to the R-Type originally done my Marco Lazzeri)
5. Game Master
6. Block Hole
7. Hydlide 3 - The Space Memories
In the meanwhile three Compile Disc Station audio CDs in the FLAC format have also been added to the download. They came with the mirror which I received of Marco Lazzeri, but he never put them online.
There's still some rare stuff lying around to be added which is submitted by SD Snatcher alpha so stay tuned.
![]()
Below is August 2013
3-Square end demo loader

In 1993 Σmphasys made a nice puzzle game called 3-Square. The game is coded in asm but uses basic as a glue. This way it's quite easy to run the end demo without playing. All you need is the basic driver of Moonblaster 1.4. Then there are a few basic commands:
10 SCREEN 0

20 BLOAD "BASIC.BIN",R

30 PRINT "Insert 3-Square disk and press a key when ready"

40 A$=INPUT$(1)

50 _MBKLOAD ("3SDRM.MBK")

60 RUN "3S-END.BIN"
![]()
Metal Gear 2 - Solid Snake in Sony Vegas 6
There is a very short though sinister tune in Metal Gear 2 - Solid Snake. I covered all notes in Moonblaster 1.4 and recorded each individual channel from one of my synthesizers using Worp3's MIDI PAC.
Since it's not a huge quantity of megabytes I decided to ZIP the Vegas 6 project and put it to download here. So if you have Sony Vegas 6 (or any other program that supports the .VEG extension) go download the project...
![]()
How CTRL+L can waste your day

Here's my Tuesday afternoon adventure with the CTRL+L button. I was playing around with Moonblaster 1.4 on my real MSX, this so many times mentioned Panasonic FS-A1WX machine. Now on this little picture above you see a little screenshot of Moonblaster 1.4 with in the bottom right corner the text Loop pos: Off. This means that when the song reaches its final position (198 of them as you can see in the top right corner behind the text Last pos) it will just not play anymore. Some tunes are not designed to end, but to restart at a certain point once they reached the end.
Now Moonblaster is an MSX music tracker. MSXes were not really designed to work with a mouse (I know, you can not imagine how hard life must have been for all those poor MSXers, but believe me, they managed well and most of them can even handle Windows without one) so loads of short-cuts and key-combos were what we learned to live with, and still do. So the L is being used for, oh yes, note linking, but with the CTRL pressed with it, the Loop position can be set. And darn me,! Every key combo worked, CTRL worked, L worked but CTRL and L was a no go at all. This tickled my interest . Read below how this one matter filled up my entire tuesday afternoon with the most ridiculous adventure I've encountered in my MSX life (since 1986).
What are the things to test first? Boot up openMSX to check what it does with my computer emulated. It works well... Ok... Next up... Boot up openMSX with the exact (as possible) config as my MSX has... Works... Damn! Next up... Boot up my MSX without any cartridge inserted and go check if CTRL+L works.
I typed the following code in basic for it:
1 a$=input$(1)

2 print asc(a$)

3 goto 3
This little code outputs the ASCII code of the key you press. It returned everything I expected except the CTRL+L combo. openMSX returned 12, so I ran out of options before doing the radical thing.
At the MSX Resource Center I posted a topic with the question how this could be and if there was something to do about it. it took too long before I got a satisfying answer so I went for the radical part. I dug up my donor computer (same type) and took out the keyboard to swap it with the crippled computer.
Before closing both computers again I found a difference in both computers. The donor has a ROM mounted as IC15 and the computer which I was fixing has just an IC foot there. Remarkable. Research on that later, first to test my "new" keyboard and yes, after hooking up the keyboard replacement CTRL+L was recognized again. Very odd since the keyboard is just a bunch of switches with no electronics in it at all. MSX guru Nyyrikki had no clue either so it must be something mysterious. Either way, it works and I'm a happy camper.
Now that IC15. I ran through the service manual of this computer which, of course, is in Japanese, so I had to make a screenshot of it and OCR it to be able to copy/paste the Japanese characters into google translate. Nothing special. Just the same as most ICs on the PCB so I started a test.
Since it's a Japanese computer and has some extras built in I tried to find some of those extras not working.
I checked the following:
- WP, the internal Japanese Word Processor: passed
- _kanji. passed
- _music and play something on MSX Music. (passed)
- check if the Kanji font is there by booting a game which supports that font. I flashed Lubeck to my MegaflashROM SCC+ SD for that. (passed)
They got me... I ran out of options... If you happen to know the answer to this mystery, please contact me...
During this testing process, I checked the easiest thing first, which is the built in Word Processor. This is achieved by sliding the button left of the reset button to the left and reset the MSX. After I checked that, I (thought I) switched the program off and booted the computer again. Lubeck was started again from the flash ROM. Reset and keeping ESC pressed to pass the internal WP gave me a big screen full of Japanese text... Rats!!! So I took a picture of that and let it translate by Rieks... Just before he replied with "There's not enough work area to boot internal software" I found the little bug and pushed the slide switch back to its OFF position... The MSX booted again... Well, Lubeck got booted, so I reset the computer again and emptied the flash ROM. Now I started the computer yet again and found out that my MegaflashROM SCC+ SD got its ROMdisk back... Now that was odd because I removed it a month ago... So I removed it again...
Well boys and girls... This is what you get when your CTRL+L combination does not work... if you don't play with any Moonblaster you'll never know, unless you try now because you read this (which I know you didn't).
![]()
Yet another music module adaption
I'm one of the last fans of the Moonblaster stereo format. This is a way of creating music on both MSX Audio and MSX Music at the same time while routing MSX Audio to the left speaker and MSX Music to the right (or the other way around).
Until I got my Panasonic FS-A1WX I always had both chips as a cartridge in my slot expander and got the audio data straight from the chips. Now I have this Japanese MSX2+ computer with a built in MSX Music. It disables my external Panasonic FM-PAC... Bummer...
Now the MSX Music comes from the audio out RCA on the back of my WX. The MSX Audio still comes from my music module, but also from the audio out RCA on my computer and thus polluting my Moonblaster stereo setup. Unacceptable.
The camera zoomed a bit on my girlfriend's birth year, but it's just below. Pin 49 (SOUNDIN) is numbered. When you open the music module it's the far right pin. Just scratch the damn line away and you're done. No more MSX Audio through your computer.
Can't compare it anymore, but in some way I believe there's less MSX noise coming from the audio output on the music module's output.
![]()
Sample address ripper for F-Kernel software
An ancient extra software released on our disk magazine DISK 2 in the mid 90s is s-ripper by MTC. He was famous back then for cracking everything on the day of its release.
Now mr. Wolf_ was in possession of some synthesizer hardware most of us teens couldn't afford. For him it was easy because his parents had a music store. Brains for muzak and equipment from family made fabulous samplekits for the music disks he participated in. As a Wolf_ he was (and damn, still is) very protective of his musical sources. Just check out his Youtube uploads and see the number of people asking him for the parameters to Wolf_'s homebrew FM8 instruments.
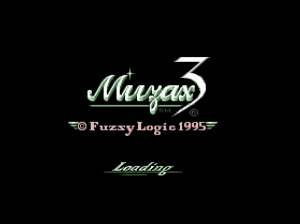
Now MTC made a little tool and I don't recall he made it for me or for anyone who would want to use it which hacks the sample addresses from memory. All you have to do is play the tune in Muzax 2 or Muzax 3 (Muzax 1 doesn't work), reset your computer, run s-ripper, write down the addresses, run Moonblaster 1.4, go to the sample menu (F3), edit the start and end addresses and save the samplekit.
Now this doesn't just apply to Muzax 1 and 2, but also to the later Sunrise Magazines and Pumpkin Adventure III and later Umax games. The software has to be made with Fuzzy Logic's F-Kernel You can recognize the software when viewing the files of any product released by Sunrise having one big .LIB file (and the two mentioned Muzax by Fuzzy Logic self).
Here's the program:
10 ' Sample address ripper for MoonBlaster
Samplekits...

20 ' LIB-files only !!!

30 '

40 ' By MTC-Software

50 '

60 ' User friendly adaption by MEITS

70 '

80 IF PEEK(&HF677)<&HC0 THEN POKE &HC000,0: POKE &HF677,&HC0: RUN "S-RIPPER.BAS"

90 SCREEN 0: WIDTH 80

100 PRINT "MTC's Sample address ripper (C) MTC-Software 1995"

110 PRINT: PRINT "1. To printer

120 PRINT "2. To screen

130 A$=INKEY$

140 IF A$="1" THEN GOTO 160 ELSE IF A$="2" THEN GOTO 250

150 GOTO 130

160 PRINT: PRINT

170 INPUT "Name :";NM$

180 LPRINT NM$: OUT&HFE,3

190 X=1: FOR A=&H99C6 TO &H99C6+55 STEP 4

200 X$=STR$(X): X$=RIGHT$(X$,LEN(X$)-1): LPRINT RIGHT$("0"+X$,2); " ";

210 LPRINT RIGHT$("0000"+HEX$(PEEK(A)+256*PEEK(A+1)),4); "-";

220 LPRINT RIGHT$("0000"+HEX$(PEEK(A+2)+256*PEEK(A+3)),4); "    ";

230 X=X+1: NEXT: LPRINT: LPRINT

240 END

250 PRINT:PRINT

260 INPUT "Name :";NM$

270 PRINT NM$: OUT &HFE,3

280 X=1: FOR A=&H99C6 TO &H99C6+55 STEP 4

290 X$=STR$(X): X$=RIGHT$(X$,LEN(X$)-1): PRINT RIGHT$("0"+X$,2); " ";

300 PRINT RIGHT$("0000"+HEX$(PEEK(A)+256*PEEK(A+1)),4); "-";

310 PRINT RIGHT$("0000"+HEX$(PEEK(A+2)+256*PEEK(A+3)),4); "    ";

320 X=X+1: NEXT: PRINT: PRINT
![]()
Pics menu
Today a picture gallery has been added. It's still quite basic as I want to work with either light frames or some fancy Java script to show the pictures in a somewhat higher resolution without destroying the site's lay-out. But ey, don't understand yet how to achieve that... You'll have to wait a bit on that one...
![]()
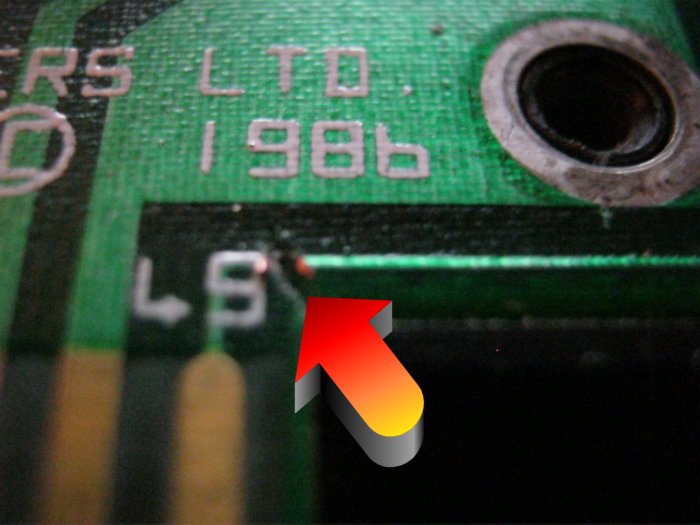
How to amplify your Philips Music Module
By default the Philips Music Module has a very weak audio output. When playing a lot of Moonblaster music - which plays MSX Audio and MSX Music at the same time and if done right each on its own speaker - and you don't have a balance button on your amplifier or speaker system it's very annoying that the Music Module's output is so ridiculously low.
It is possible to amplify the Music Module to about the same volume as your FM-PAC by replacing resistor R41 with a 27K one. On the picture below this is pointed out:
Default both horizontal resistors in the zoomed part are the same as the lower one. The top one should be replaced as has happened on this picture.
This little modification will satisfy your ears so much, so get going.
![]()
Rip a palette

Once upon a time I needed some graphics but were too lazy to draw anything let alone wait for someone else to draw it for me. There were enough graphics around on the BBSes, so I just took some graphics from someone who never knew. The only problem was how to get it to look nice on an MSX. I mean, it's really easy to first pre-edit the file in some photo editor to 512x212x16 and then save it as a GIF file. But then what?
Out of several GIF file viewers GIFDUMP was the lucky winner. It saves the palette in the screen 7 file, so the little code below works just fine.
10 SCREEN 7

20 BLOAD "GIFFILE.SC7",S

30 COLOR=RESTORE

40 GOTO 40
But the picture had to be retouched. it still looked too horrible to use on an MSX. Plus there needed to be a font for the scroller so what I needed were the RGB values of every color. Goody, now what...
After some reading in documents I found out that in screen 7 the palette data is stored from &HFA80 to &HFA9F so I could add an extra line in the listing above... Joy!
35 BSAVE "GIFFILE.PAL",&HFA80,&HFA9F,S
Of course this palette file brought me nowhere but it was fun to find. Useless... Or, is it? No sir! If you don't press PRINT SCREEN on your emulator, you can turn a screen 5/7 file to GIF with ENGIF. This tool supports the PAL file and not the PL5/7 files Graphsaurus uses.
Then, in all my seventeen year old wisdom I decided to convert it to hard digits which I could read. I said Wisdom because the tool I wrote to achieve that is printed below and can be optimized very well... it's just that I was a little kid back then and I don't want to ruin the stuff I made back then...
Here be the listing
10 SCREEN 7

20 DEFINT A-Z

30 BLOAD "GIFFILE.SC7",S

40 COLOR=RESTORE

50 FOR I=0 TO 10

60 A(I)=VPEEK(&HFA80+I)

70 NEXT

80 FOR I=0 TO 10

90 B(I)=VPEEK(&HFA80+I+11)

100 NEXT

110 FOR I=0 TO 10

120 C(I)=VPEEK(&HFA80+I+22)

130 NEXT

140 SCREEN 0

190 PRINT "COLOR  0",HEX$(A(0));:PRINT HEX$(A(1))

200 PRINT "COLOR  1",HEX$(A(2));:PRINT HEX$(A(3))

210 PRINT "COLOR  2",HEX$(A(4));:PRINT HEX$(A(5))

220 PRINT "COLOR  3",HEX$(A(6));:PRINT HEX$(A(7))

230 PRINT "COLOR  4",HEX$(A(8));:PRINT HEX$(A(9))

240 PRINT "COLOR  5",HEX$(A(10));:PRINT HEX$(B(0))

250 PRINT "COLOR  6",HEX$(B(1));:PRINT HEX$(B(2))

260 PRINT "COLOR  7",HEX$(B(3));:PRINT HEX$(B(4))

270 PRINT "COLOR  8",HEX$(B(5));:PRINT HEX$(B(6))

280 PRINT "COLOR  9",HEX$(B(7));:PRINT HEX$(B(8))

290 PRINT "COLOR 10",HEX$(B(9));:PRINT HEX$(B(10))

300 PRINT "COLOR 11",HEX$(C(0));:PRINT HEX$(C(1))

310 PRINT "COLOR 13",HEX$(C(2));:PRINT HEX$(C(3))

320 PRINT "COLOR 14",HEX$(C(4));:PRINT HEX$(C(5))

330 PRINT "COLOR 15",HEX$(C(6));:PRINT HEX$(C(7))

340 PRINT "COLOR 15",HEX$(C(8));:PRINT HEX$(C(9))
Oh rats, I'm slightly embarrassed of the above, but don't whine, it works and you can just copy/paste it into catapult of openMSX but remember one important thing: you just peeked the RBG values and NOT the RGB values. So swap around the last two digits will ya...
Anyhoo, you have the palette on screen now, and since you're in an emulator now you don't need to write everything down anymore. A screen dump is sufficient or just open another emulator next to it. Boot Graphsaurus 2.0 because imho that's the only right drawing tool on MSX. Bload the SC7 file and alter the RGB values you just vpeeked with the tool above.
Want to do the same with a screen 5 file? In screen the palette is stored from &H7680 to &H769F. With that info you can do the math...
Later I wrote a tool called PALJAT.BAS and updated it to PALJAT2.BAS after that. I've used it a few times, but mostly for the fun of it. It's a tool in Dutch so you have to live with that. The uncensored version of it is below:
10 ' Palette peeken uit screen 5 en screen 7

20 '

30 ' Door Jelle Jelsma 1997 (C) Near Dark

40 '

50 '

60 ' INTRO

70 '

80 '

90 ' Schermopbouw *************************************************************

100 '

110 SCREEN 0: KEY OFF: VDP(14)=0

120 DEFUSR0=&H41

130 DEFUSR1=&H44

140 DEFUSR2=&H156

150 A=USR0(0): COLOR: COLOR 15,0,0: WIDTH 80: POKE &HFCAB,1

160 FOR I=&H800 TO &H8EF: VPOKE I,0: NEXT

170 FOR I=&H800 TO &H81D: VPOKE I,255: NEXT

190 LOCATE0,1:PRINT" Palette peeken in screen 5 en 7"SPACE$(28)"By Meits 1997"

210 LOCATE 32,6:PRINT"SCREEN 5"

220 LOCATE 32,7:PRINT"SCREEN 7"

230 LOCATE 32,9:PRINT"KAPPUH!!"

240 LOCATE 23,22:PRINT"[L] = Logdrive [P] = Path"

250 '

260 VPOKE &H840,255

270 VDP(14)=16

280 VDP(13)=15*16+4

290 '

300 ' HOOFDMENU ***************************************************************

310 '

320 LO=1: VP=&H840: A=USR2(0)

330 A$=INKEY$

340 IF A$=CHR$(30) THEN GOSUB 430

350 IF A$=CHR$(31) THEN GOSUB 450

360 IF A$=CHR$(32) THEN 480

370 IF A$=CHR$(13) THEN 480

380 IF A$="L" OR A$="l" THEN GOSUB 1580

390 IF A$="P" OR A$="p" THEN GOSUB 1600

400 A=USR1(0)

410 GOTO 330

420 '

430 IF LO=3 THEN GOTO 440 ELSE IF LO=1 THEN RETURN ELSE VPOKE VP,0: VPOKE
VP-10,255: LO=LO-1: VP=VP-10: RETURN

440 VPOKE VP,0: VPOKE VP-20,255:LO=LO-1:VP=VP-20:RETURN330

450 IF LO=2 THEN GOTO 460 ELSE IF LO=3 THEN RETURN ELSE VPOKE VP,0: VPOKE
VP+10,255: LO=LO+1: VP=VP+10: RETURN

460 VPOKE VP,0: VPOKE VP+20,255:LO=LO+1:VP=VP+20:RETURN330

470 '

480 IF LO=1 THEN PK=&H7680: GOTO 540

490 IF LO=2 THEN PK=&HFA80: GOTO 820

500 IF LO=3 THEN GOTO 1410

510 '

520 ' SCREEN 5

530 '

540 VDP(14)=0: CLS: PRINT "-- SCREEN 5 FILES --":PRINT:PRINT

550 ON ERROR GOTO 1540

560 FILES"*.GL5"

570 FILES"*.SR5"

580 FILES"*.SC5"

590 FILES"*.GE5"

600 PRINT:PRINT:PRINT:A=USR2(0):LINEINPUT"File (inclusief extensie): ";G$

610 IF G$="" THEN RUN

620 IF RIGHT$(G$,3)="GE5" THEN SCREEN 5: A=USR0(0): BLOAD G$,S: GOTO 770

630 CLS:PRINT"Moet er ook een palet bij (J/N) ? ":A=USR2(0)

640 A$=INKEY$

650 IF A$="J" OR A$="j" THEN 680

660 IF A$="N" OR A$="n" THEN SCREEN 5: A=USR0(0): GOTO 760

670 GOTO 640

680 CLS: PRINT "-- SCREEN 5 PALETTEN --":PRINT:PRINT

690 ON ERROR GOTO 1540

700 FILES"*.PAL"

710 FILES"*.PL5"

720 PRINT:PRINT:PRINT:A=USR2(0): LINEINPUT"File (inclusief extensie): ";P$

730 IF P$="" THEN SCREEN 5: A=USR0(0): GOTO 760

740 IF RIGHT$(P$,3)="PAL" THEN SCREEN5: BLOAD P$,S

750 IF RIGHT$(P$,3)="PL5" THEN SCREEN5: GOSUB 1450

760 A=USR0(0):IF RIGHT$(G$,3)="GL5" THEN COPY G$ TO (0,0): GOTO 770 ELSE BLOAD
G$,S

770 COLOR=RESTORE: A=USR1(0): A=USR2(0)

780 A$=INPUT$(1): GOTO 1100

790 '

800 ' SCREEN 7

810 '

820 VDP(14)=0: CLS: PRINT "-- SCREEN 7 FILES --":PRINT:PRINT

830 ON ERROR GOTO 1540

840 FILES"*.GL7"

850 FILES"*.SR7"

860 FILES"*.SC7"

870 FILES"*.GE7"

880 PRINT:PRINT:PRINT:A=USR2(0): LINEINPUT"File (inclusief extensie): ";G$

890 IF G$="" THEN RUN

900 IF RIGHT$(G$,3)="GE7" THEN SCREEN 7: A=USR0(0): BLOAD G$,S: GOTO 1050

910 CLS:PRINT"Moet er ook een palet bij (J/N) ?":A=USR2(0)

920 A$=INKEY$

930 IF A$="J" OR A$="j" THEN 960

940 IF A$="N" OR A$="n" THEN SCREEN 7: A=USR0(0): GOTO 1040

950 GOTO 920

960 CLS: PRINT "-- SCREEN 7 PALETTEN --":PRINT:PRINT

970 ON ERROR GOTO 1540

980 FILES"*.PAL"

990 FILES"*.PL7"

1000 PRINT:PRINT:PRINT:A=USR2(0): LINEINPUT"File (inclusief extensie): ";P$

1010 IF P$="" THEN SCREEN 7: A=USR0(0): GOTO 1040

1020 IF RIGHT$(P$,3)="PAL" THEN SCREEN7: BLOAD P$,S

1030 IF RIGHT$(P$,3)="PL7" THEN SCREEN7: GOSUB 1450

1040 A=USR0(0):IF RIGHT$(G$,3)="GL7" THEN COPY G$ TO (0,0): GOTO 1050 ELSE BLOAD
G$,S

1050 COLOR=RESTORE: A=USR1(0): A=USR2(0)

1060 A$=INPUT$(1): VDP(14)=0: GOTO 1100

1070 '

1080 ' HET PEEKWERK

1090 '

1100 DIM VP(32)

1110 DIM A$(32)

1120 FOR I=0 TO 32

1130 VP(I)=VPEEK(PK+I)

1140 NEXT I

1150 T=0

1160 FOR I=0 TO 31 STEP 2

1170 A$(T)=HEX$(VP(I)): IF LEN(A$(T))=1 THEN A$(T)="0"+A$(T)

1180 A$(T)=A$(T)+HEX$(VP(I+1))

1190 T=T+1

1200 NEXT

1210 '

1220 ' HET RESULTAAT OP HET SCHERM ZETTEN *************************************

1230 '

1240 SCREEN 0: A=USR0(0): FOR I=&H800 TO &H8EF: VPOKE I,0: NEXT I

1250 LOCATE 12,0: PRINT"R,G,B"

1260 FOR I=&H815 TO &H8A1 STEP 20: VPOKE I,255: NEXT: VDP(14)=16

1270 FOR I=&H816 TO &H8A2 STEP 20: VPOKE I,128: NEXT: VDP(14)=16

1280 FOR I=&H814 TO &H8A0 STEP 20: VPOKE I,255: NEXT: VDP(14)=16

1290 FOR I=0 TO 15: LOCATE 0,I+2: PRINT"COLOR"I: NEXT

1300 FOR I=0 TO 15: LOCATE 12,I+2: PRINT
LEFT$(A$(I),1)","MID$(A$(I),3)","MID$(A$(I),2,1): NEXT

1310 LOCATE 30,4:PRINT"YES! YES! HET WERKT!!!

1320 LOCATE 12,20: PRINT "-= DRUK OP SPATIE OF RETURN =-"

1330 A=USR1(0): A=USR2(0)

1340 A$=INKEY$

1350 IF A$=CHR$(32) THEN VDP(14)=0: RUN

1360 IF A$=CHR$(13) THEN VDP(14)=0: RUN

1370 GOTO 1340

1380 '

1390 ' KAPPUH!!! **************************************************************

1400 '

1410 POKE &HFCAB,0: VDP(14)=0:CLS: LIST 1410: END: ' Zelf invullen

1420 '

1430 ' GraphSaurus Palette loader *********************************************

1440 '

1450 OPEN P$ AS #1 LEN=32: FIELD #1,32 AS A$

1460 GET #1,1: CLOSE #1

1470 FOR A=0 TO 31: VPOKE PK+A,ASC(MID$(A$,A+1,1))

1480 NEXT A

1490 COLOR=RESTORE

1500 RETURN

1510 '

1520 ' FOUTAFHANDELING

1530 '

1540 RESUME NEXT

1550 '

1560 ' Logdrive en Path

1570 '

1580 LOCATE 0,15:INPUT"Logdrive";Q$

1590 IF Q$="" THEN GOSUB 1620: RETURN ELSE _CHDRV(Q$+":"):GOSUB 1620: RETURN

1600 LOCATE 0,15:INPUT"Path ";Q$

1610 IF Q$="" THEN GOSUB 1620: RETURN ELSE _CHDIR(Q$):GOSUB 1620: RETURN

1620 LOCATE 0,15:PRINTSPACE$(11+LEN(Q$)): RETURN
Now see what you can do with that
![]()
MSX Repository
MSX Repository is back. Not on its old domain since the original maker of the site decided to abandon it. There was still demand to the site, so I decided to mirror it.
![]()
Below is July 2013
How to rip music from Jarretenk, Near Dark and Near Dark 2,5
Here be two screenshots from sector 7 of our music disk Near Dark:
Since the software was sold on major Dutch MSX fairs, there was little need to go English on everything, but since there's internet and we shouldn't use our own national language to scare foreign people away (hi Spain, Japan and Korea :) ) there's an English translation below:
For the hackers among us. The music is easily ripped: Search the title (of the tune) from the sectors and save this with WB (the coder means WB-ASS2, since that's what he used) with:
GET 0,SECTOR NUMBER,AMOUNT OF SECTORS e.g. 30 (almost always enough) ,#8000
Save the file with:
DSAVE "FILENAME",#8000,#BFFF and you're done...
But don't touch the ML sources, they're holy for me!!! (hah! as if the sources are on those disks)
Copyright:
Chip (c)
So, happy outdated MBM hacking guys...
![]()
Waarom ik bij xs4all ben weggegaan
Ik had er een connectie van 8Mb downstream en nog minder upstream. Nu kon ik upgraden tot hun snelste variant van (slechts) 40Mb (indien beschikbaar in onze regio, want daar zit je ontzettend mee, die oude koperdraadjes van de telefoonboer KPN). Zeer onrealistisch dat ik dat hier zou kunnen ontvangen.
Nu was mijn verbinding wel verhoogd naar 10Mb, maar daar kon het super de luxe FritzBox modem totaal niks mee.
Aangezien we TV kijken op een 44" scherm, en dat nog altijd deden met het inferieure Digitenne van KPN, is een en ander eens met elkaar vergeleken. De beste xs4all, welke hier niet beschikbaar is, legt het op bijna alle fronten af tegen UPC.
Natuurlijk heeft xs4all er een aantal leuke bijzaken bij zoals een goede helpdenk, maar wie belt dat nu? Dan nog het gratis F-Secure als virusscanner voor drie computers. Een blaag van een vervelend programma is dat. Nooit geinstalleerd, gewoon Eset NOD32 aangeschaft.
We hebben nu een 60Mb lijn van UPC met digitale TV met een extra zenderpaket en telefoon (ok, als UPC dan eens storing heeft ligt alles eruit, maar we zijn geen 1999 meer. Dat netwerk is wel wat steviger geworden).
Overzichtje van de max van xs4all vs een middenmoter van de UPC (uitleg percentages: de ene is x% ten opzichte van de andere):
| xs4all | upc | xs4all | upc | |||
| Service | internet down | 40 | 60 | 66,67% | 150,00% | |
| internet up | 4 | 6 | 66,67% | 150,00% | ||
| TV zenders | 66 | 111 | 59,46% | 168,18% | ||
| HD TV zenders | 10 | 32 | 31,25% | 320,00% | ||
| Radio zenders | 99 | 90 | 110,00% | 90,91% | ||
| Telefoon vast | € 0,03 | € 0,09 | 33,89% | 295,08% | ||
| Telefoon mobiel | € 0,16 | € 0,09 | 175,11% | 57,11% | ||
| punten | 5,43 | 12,31 | ||||
| punten 1-10 | 4,41 | 10,00 | ||||
| Prijs | €61,00 | €59,50 | 102,52% | 97,54% |
![]()
FAT Sorter
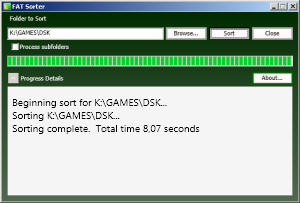
I always like the way modern OSes alphabetize the files in your folders, even though they're physically scattered all over your media. The file managers, DOS and Basic on MSX just show you how it really is. This mostly results in a big pile of files/dirs in random order. In the FAT12 period we could use programs like Dirsort or Improve to create some order in the wilderness. Unfortunately, these programs don't accept FAT16.
People with FAT16 flash media are doomed to live in a mess. I didn't like this at all, therefore I went on a google session and found a nice little tool. FAT Sorter.
FAT Sorter does the trick for me in Windows. The benefit of it is that a Windows computer sorts stuff quite a bit faster than an MSX would ever can.
One draw back of this tool is that (at least in my configuration) the Process subfolders box can not be checked. This means you've got to repeat the process for every folder you want to be sorted. Living in the age of ROM and DSK files and not with the content of it, this shouldn't be that time consuming.
Try FAT Sorter. Here's your link.
![]()
XAK - The Tower of Gazzel - MAP

About a year ago I released the complete map of Microcabin's XAK The Tower of Gazzel to the MSX Resource Center. Hundreds of screenshots went into this piece of hours weeks consuming project. The big labor was to erase every Latok and enemy in the screenshots and add the content of every treasure chest. Then let everything fit together as seamless as possible. Since I don't use a raw render of openMSX, transition lines between different tiles might be visible (if you zoom enough). If you're comfortable with that, you could download the zip of +20 MB in the
downloads section.
![]()
MSX Translations news
![]()
MSX Translations, responsible for several nice English translations of Japanese games is working on yet another IPS patch for a game. As an extra this game will also support MSX Music and MSX Audio like the Ashguine 2 IPS patch did. I've seen the progress of the translation and I've made some progress on the OST. I'm halfway which means the easiest tunes are done. Now for the crappy :)
Stay tuned.
![]()
MegaFlashROM SCC+ SD
Since this device has an optional ROM disk, native FAT16 support and is hard coded when it comes to drive letters in a way we're not used to since the IDE time, there's quite some tweaking possible. An intelligent AUTOEXEC.BAT which sets up things you want to is quite necessary. Why?
An MSX is slow... Every time you perform a DIR command from the DOS prompt, DOS will calculate the free disk space. In the FAT12 era with partitions up to 32MB this was not really annoying. Since Nextor, the "DOS" in this device, can handle FAT16 out of the box, 4GB is quite something different. Calculating the free disk space can take up to a minute or more. Therefore RALLOC.COM is a very welcome tool. RALLOC.COM reduces the calculated free disk space to a maximum of 32MB. Very handy.
Then there's MAPDRV.COM. If you use more than two partitions you're gonna need this. Otherwise you'll only see the first partition. Quite poor compared to the IDE interfaces we've seen in the past. The options are also something that need to be studied and are hard to understand. Since I don't care to split an micro SD card into partitions and have both slots filled, I didn't have to do so much fiddling to get it working because the examples were given by the coder himself on MSX.ORG. But there's a huge BUT. If you are going to put this map driving in your AUTOEXEC.BAT (and trust me, you want to) you're stuck to put the interface in the same slot you've programmed it on. MAPDRV.COM wants you to input in which slot the interface is inserted. If you programmed it in slot 1, your AUTOEXEC.BAT will generate errors when the drives are being mapped if you inserted the interface in slot 2... Hmmm... What to do...
There's a need for an intelligent AUTOEXEC.BAT, but as we all know batch files are rather clumsy. We'll need a bit of BASIC in it, peek where the interface is, go back to DOS and boot a second batch file (see it as the tail of the AUTOEXEC.BAT) to do the drive mapping. Well, whilst being in BASIC anyway, some other things could be set. Function keys pop into mind. Also all the settings one can set with the SET command can be put here since there still are a few coders (?) who think they know better how your settings should be (think of a totally bad SET ADJUST, BEEP, PROMPT or any screen or color setting in general).
The returning back to DOS (or Nextor if you will) and let the right batch file to continue the AUTOEXEC.BAT's second phase needs a bit of tricky coding since you actually can't say CALL SYSTEM: SECOND.BAT. After the CALL SYSTEM your BASIC program is away and nothing will happen, unless you filled the keyboard buffer with a command.
Now for the practical part. The cut in three files boot sequence which makes booting take quite a tad longer, but will make life a lot easier is described below.
There are four files needed for the two slots the interface can be put in.
AUTOEXEC.BAT
set prompt on

set expert on

path = b:\utils ; a:\utils ; a:\ ; a:\mm

speedon

alias .txt = ted

alias .bas = basic

alias .ldr = basic

alias .jpg = jpd

alias .mid = midiplay

alias .gif = vgif

alias .pma = pmext

alias .lzh = pmext

alias dp dir/p

alias dw dir/w

key.bas
- There's also a path to b:\utils. This is because you don't want to bother changing the ROMDISK each time you add a utility.
- Speedon is a tool to change the CPU speed of a Panasonic MSX2+ to turbo mode (just a little less than 6MHz)
- Add or remove some aliases if you want.
- Key.bas loads the settings code written in BASIC to make life easier once the boot sequence is done (note that alias .bas = basic is required)
KEY.BAS (the name key.bas is because initially this program was written to just change the function keys)
10 ' Some settings

20 '

30 SCREEN 0,,0

40 VDP(10)=0

50 SET ADJUST (0,0)

60 COLOR 15,0,0

70 SET PROMPT "files'"

80 SET BEEP 1,4

90 WIDTH 80

100 SET SCREEN

110 '

120 ' Set function keys 1 to 8

130 '

140 KEY 1,"opfxsd "

150 FOR I=2 TO 8

160 READ FK$(I)

170 KEY I,FK$(I)+CHR$(13)

180 NEXT I

190 CLS

200 '

210 ' Command once back in DOS

220 '

230 A=PEEK(&HF348)AND3:IFA=1THENA$="1" ELSE IF A=2 THEN A$="2"

240 '

250 A$=LEFT$(A$,8)+CHR$(13): L=LEN(A$)

260 POKE &HF3FA,&HF0: POKE &HF3FB,&HFB

270 POKE &HF3F8,&HF0+L: POKE &HF3F9,&HFB

280 FOR T=1 TO L

290 POKE &HFBEF+T,ASC(MID$(A$,T,1))

300 NEXT T

310 _SYSTEM

320 '

330 ' Function keys 2 - 8

340 '

350 DATA "_system"

360 DATA "basic"

370 DATA "dir/w"

380 DATA "mm"

390 DATA "color 15,0,0"

400 DATA "speedon"

410 DATA "speedoff"
- Lines 10 to 100 restore the screen settings how I want them. You're free to change them. Programs programmed by coders who didn't feel the need to leave these settings alone won't bother you anymore. Even an empty BIOS battery won't bother you anymore.
- Lines 140 to 190 set the function keys. F1 has "OPFXSD " has its own line in this program. The reason is that after typing OPFXSD you need to add what you want OPFXSD to do. The rest of the funtion keys are just commands (see DATA lines 350 to 410) and therefore a RETURN right after it is added. Would I have done this to the F1 key, you'd only get the help of OPFXSD. You don't want that.
- Lines 230 to 310 peek in which slot the interface has been inserted, put a 1 or a 2 (depending on the outcome of the PEEK) in the key buffer. A CALL SYSTEM is performed and DOS will continue with one of the batch files below.
1.BAT (will be started when returning to DOS if the interface is inserted in slot 1)
mapdrv e: 1-0 3 1-3

ralloc b: on

ralloc e: on
2.BAT (will be started when returning to DOS if the interface is inserted in slot 2)
mapdrv e: 1-0 3 2-3

ralloc b: on

ralloc e: on
- Notice the minor difference in the first line. Here is where the returning to BASIC was needed for.
- The ROMDISK is on A:
- The first SD card which is one big partition is on B:
- Physical disk drive A: is hard coded on C:
- Physical disk drive B: is hard coded on D:
- The second SD card which is one big partition is mapped to E:
![]()
Below is June 2013
Game tips from DISK. DISK was the Near Dark disk magazine in the 90s which you can download here.
Ganbare Goemon (Samurai) passwords

Stage 1: P.YN7IS1S
Stage 2: )A=3;\02T
Stage 3: .S(4N(Y2S
Stage 4: =E- Deadkey J,72R
Stage 5: =E= Deadkey J,72T
Stage 6: ZPC8TV.4T
![]()
Not Again! passwords

STAGE 2: 5483902766
STAGE 3: 1968472897
STAGE 4: 7689204052
STAGE 5: 3182013486
STAGE 6: 6144167892
STAGE 7: 5259812346
STAGE 8: 9785239552
STAGE 9: 4564259631
STAGE 10: 8947358921
STAGE 11: 8225147854
STAGE 12: 6238154884
STAGE 13: 8723951289
STAGE 14: 9876543218
STAGE 15: 2857661023
STAGE 16: 3978458166
STAGE 17: 3774819565
STAGE 18: 4487682011
STAGE 19: 7658456212
STAGE 20: 7747824534
STAGE 21: 0050036721
STAGE 22: 4567283421
STAGE 23: 0104400228
STAGE 24: 1115782314
STAGE 25: 1223421341
STAGE 26: 9956723834
STAGE 27: 7867662512
STAGE 28: 7924512846
STAGE 29: 7877252345
STAGE 30: 1265095623
STAGE 31: 9898942990
STAGE 32: 1638563900
![]()
Nemesis 1/Gradius 1 passwords

All passwords work only once. Hyper can be input in every stage (but again, only just once per game)
Per stage there are passwords that do the same:
Stage 1: MOMOKO
Stage 2: CHIE
Stage 3: AKEMI
Stage 4: SYUKO
Stage 5: CHIAKI
Stage 6: NORIKO
Stage 7: SATOE
Stage 8: YASUKO
Bonus stage 1: KINUYO
Bonus stage 2: HISAE
Bonus stage 3: MIYUKI
Bonus stage 4: YOHKO
Game over: BAKA (indeed, a password one can't live without)
![]()
Metal Gear 2 - Solid Snake password

Note, this password only works on non-Japanese computers:
V'4A'I GZ'ZQ >2BQ' <YAF
KE[E' 0G'BV C'F'X'D' DD'1A
U[TA 1G'2F' DGW'J G'Q'A'I
V'7GQ' [TZ'V I1CP' PGY';
B'E7D VNZ'Z' S36K QRF'R
QJBQ'
![]()
The Tower of Cabin Debug Mode

Here is how to enter the debug mode of The Tower of Cabin:
Press ESC to pause the game. Press CURSOR UP, CURSOR RIGHT, CURSOR DOWN, CURSOR LEFT, C
![]()
Akin passwords

Chapter 2 (Witness): CHAKRI
Chapter 3 (The hunt): PHUKET
Chapter 4 (Sleep well): CHEDI
Chapter 5 (Flower of death): BAHT
Chapter 6 (Avon): SUKHOTHAI
Chapter 7 (Virtual freedom): VISAKHA
Chapter 8 (Evolution): MAKHA
Chapter 9 (Fireworks): ASALHA
Chapter10 (Nice outfit): VIHARN
Chapter11 (Irr'zai): KULCHAREE
Chapter12 (Fence): WASUN
Chapter13 (Speed): SANGHA
Chapter14 (Epilogue): KRYSTI
And then there's the ridiculous password PINDAKAAS. Check it out if it's worth something for you.
![]()
Super Cooks user disk

A long while ago I saved my Super Cooks game right at the end. To make it transportable (DSK didn't exist (in my world) back then) I made an XSA file of it. Xelasoft made a nice tool to compress any disk and turn it into a file. Use F2D.COM to extract the user disk. If you use openMSX, the XSA file is sufficient.
![]()